
Phone Number Management
Preferences> Phone Number Management
Introduction
MyMedLeads Phone Number Management is a comprehensive phone call management system tailored for the medical industry. It enables you to generate new phone numbers and forward them to office or personal lines. The software integrates with the MyMedLeads API to generate leads from incoming calls.
Intended Audience
The intended audience for this document are MyMedLeads users who manage phone lines within their medical practices.
Phone Call Management Requirements
When using the MyMedLeads Phone Call Management solution, it is always required to comply with all applicable local, state, and federal laws. This includes, but is not limited to, obtaining consent from leads and patients before contacting them by phone. The MyMedLeads Phone Call Management solution seamlessly integrates with your existing phone systems without requiring any hardware or software installation.
Amount of Phone Numbers Available to you
MyMedLeads provides your account with 10 phone numbers to start. You can request additional phone numbers, though fees may apply.
Phone Number Capabilities
All of our Call Tracking Phone Numbers can forward calls to any phone. They have standard features like call recording and staff whispers that announce the caller’s LeadSource. When you create a new Call Tracking Number, it comes with a recommended greeting that informs callers their call may be recorded to comply with state and territorial laws. Here are some key Text/SMS capabilities:
- There is a single outgoing phone number for Appointment Reminders. You can choose which number to use under Preferences -> Patient Communications. Select from your Call Tracking Numbers dropdown. Choosing a number as the From Number doesn’t affect its ability to capture caller info and forward calls.
- Two-Way Texting requires assigning a Location to a Call Tracking Number (see TwoWay Texting docs for setup details). You can associate numbers to Locations on the Phone Number Management page. When you select a Location, that number shows it will be used for TwoWay Texting for that Location (hover over the Texting icon to see the LocationName).
- Two-Way Texting adds compliance by default. The system automatically gets consent from recipients.
Phone Number Management
To access your phone numbers and related settings:
- From the main menu, go to Preferences > Phone Number Management. This screen displays your current phone numbers.
- On the Phone Number Management screen, you can:
- Create new phone numbers
- Update existing numbers
- Set recording and greeting preferences
- Enable/disable Call Whispers
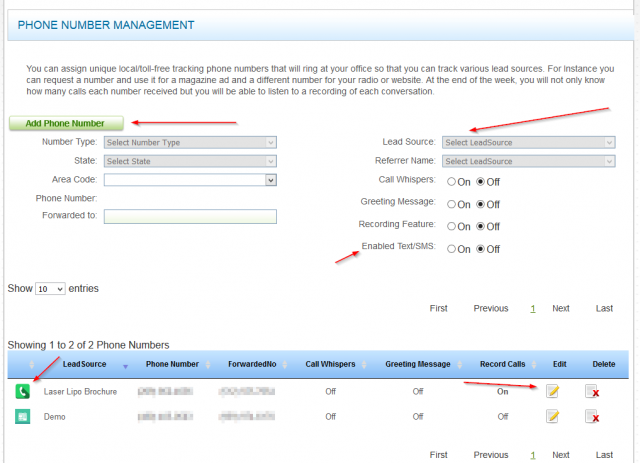
To Create a New Phone Number
To set up your phone number within your account on the website:
- Navigate to the Phone Management page under Preferences.
- Click the “Add Phone Number” button at the top to begin.
- Choose if you want a local or toll-free number. Additional fees may apply for toll-free.
- Select the state and area code for a local number. For toll-free numbers, you cannot pick a single state since it will be national.
- If needed, click “Retrieve Numbers” next to the Twilio Number dropdown to see more options.
- Enter the number to forward calls to in the “Forwarded to” field.
- Set the default lead source for callers reaching this number.
- Enable call whispers to announce the lead source to your staff when receiving calls.
- Pick between default and custom greeting messages. The default informs callers they may be recorded. If recording calls, keep the default on for compliance.
- Turn on text/SMS if using two-way texting.
- Enable call recording to later review calls.
Updating an Existing Phone Number
To update an existing phone number, navigate to the Phone Management screen under Preferences in your account. On this screen, you can update the following details for a MyMedLeads tracking number:
- The phone number receiving forwarded calls
- The default lead source applied to calls
- Settings for call whispers, recordings, and greetings
To update a phone number:
- Locate the phone number in the list of phone numbers.
- Press the Edit icon. This will populate the form above with the phone number’s details. Cancel and Update buttons will appear.
- Edit the phone number fields as needed.
- Press Update. The changes will be saved immediately.
Custom Call Greetings
Phone Greeting Management
The process of managing greetings within your MyMedLeads account is simple and requires only your telephone. In this section, we explain how to create, update, record, and delete new phone greetings.
Greeting Management Process
To create and use a new phone greeting: First, make a new greeting. Second, call in and record it. Third, activate the greeting. Finally, apply it to one or more phone numbers.
Setting Up Your First Greeting
To manage your greetings in MyMedLeads, first navigate to the Phone Management screen from the Preferences page in your account. At the bottom of the Phone Management screen, click the “Greeting Management” button to open the Greeting Management page. On this page, you can create multiple greetings and manage any existing ones. Before recording a new greeting, you must first create it on the Greeting Management page so that the recording can be properly associated.
- Press the Create Greeting button at the top of the screen to initialize the form and prepare it to accept a new phone greeting.
- Enter a descriptive name in the Display Name text field.
- Toggle the Activate field on if you want the greeting to be selectable from the Phone Management screen. If not activated, the greeting cannot be applied to any phone number.
- Press Create when finished.
You have successfully made your first greeting within MyMedLeads. However, it currently uses the default message from the Phone Call Management system. To record a custom greeting, you will need to complete the next 4 steps.
Recording a Custom Greeting
- If you have just created a new greeting, you can skip this step. Otherwise, select the greeting you want to record by clicking the Edit button in the same row.
- The Record button will become active. Click it to open a form where you can enter a valid phone number and press Call Me.
- In a few seconds, you will receive a call prompting you to record your greeting after the beep. Press the pound key (#) when finished.
- The system will play back the recording and prompt you to press 1 to save it or 2 to re-record. You can re-record as many times as needed without overwriting the previous version until you press 1 to confirm. Once confirmed, the new recording will replace the old one.
Applying a Greeting to a Phone Number
- Go to the Greeting Management page and ensure the desired greeting is set to Active.
- Go to the Phone Number Management page and click Edit on the row for the phone number.
- In the top form, select On next to Greetings. A dropdown will appear with active greetings.
- Select the desired greeting from the dropdown.
- Click Update. The selected greeting will now play for incoming calls to that phone number.
Applying a Greeting to All Greetings-enabled Phone Numbers
You can set one Greeting to apply to all phone numbers with greetings enabled. Numbers without greetings will not be affected. To do this:
- Go to Phone Greeting Management and find the greeting to set as the default.
- Click Edit on that greeting’s row.
- In the top form, press Set Globally.
- The greeting will immediately apply to all numbers with greetings on.
Default Greeting Message
The Default Greeting Message can be quickly applied to any Call Tracking Number without needing custom recordings. This default message says:
“This phone call will be recorded for quality assurance “