
Introduction
This guide will walk you through the process of integrating websites with MyMedLeads using Zapier, a third-party automation platform. If your website or ad platform can post data via Zapier, you can take advantage of our no-code-required solution to streamline lead capture.
Zapier acts as a bridge between web applications, enabling them to communicate and automate workflows. It operates on a trigger-and-action model: a trigger is an event in one app (such as a new lead submission), and the action is the resulting task performed in another app (such as sending that lead to MyMedLeads).
Intended Audience
This guide is designed for webmasters, developers, or anyone familiar with using Zapier.
Basic knowledge of form setup and Zapier’s interface is recommended to successfully complete the integration.
Integration Requirements Using Zapier
To successfully integrate your website with MyMedLeads via Zapier, please ensure the following requirements are met:
- Zapier Account Access
You must have an active Zapier account, https://zapier.com/. Please note that Zapier is a paid service, and charges may apply. - MyMedLeads Transaction Key
This key is required for integration and identifies the Lead Source (EX: Facebook Ads) and your account. To retrieve your Transaction Key, follow these steps within your MyMedLeads account:- Log in to MyMedLeads.
- Navigate to Preferences > Edit LeadSources.
- On the LeadSources screen, you’ll see a list of available sources or you can add a new Lead Source at this time.
- Next to each Lead Source, there is a green key icon. Click on this icon to view the Transaction Key associated with that Lead Source.
- Compatible Platforms
The websites or platforms you wish to integrate must support Zapier. This includes popular ad platforms like Facebook Ads and Bing Ads, which can send data directly into Zapier. - Form/Ad Configuration
Setting up your website forms or ad platforms to send data to Zapier is the responsibility of your team. Due to the wide variety of tools (e.g., ContactForm7, Gravity Forms, Facebook Ads), this guide does not include platform-specific instructions. For help with setup, we recommend referring to Zapier’s documentation or the relevant plugin guides.
Zapier Integration Implementation
Once your team has configured your website or ad platform to send data to Zapier, you can proceed by adding a Webhook step to your Zap that utilizes POST. On the configuration screen, you’ll enter a URL (provided by MyMedLeads upon request) and begin mapping your form or ad data to specific Variable Names recognized by MyMedLeads.
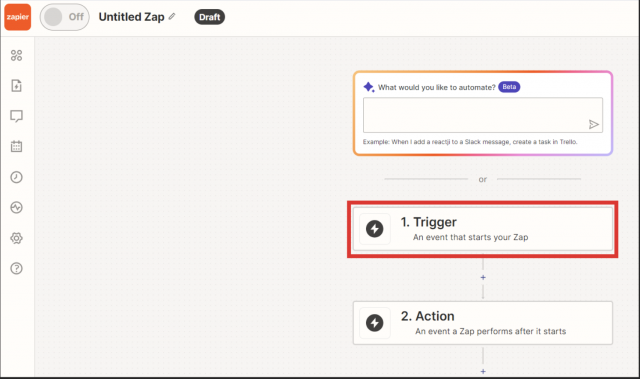
Step 1: Connecting to the Form You Want to Integrate
To begin integrating your form or ad platform with Zapier:
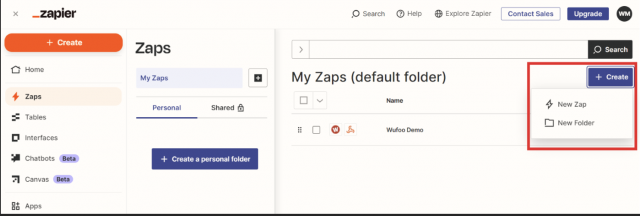
- Log into your Zapier account.
- Click Create, then select New Zap.
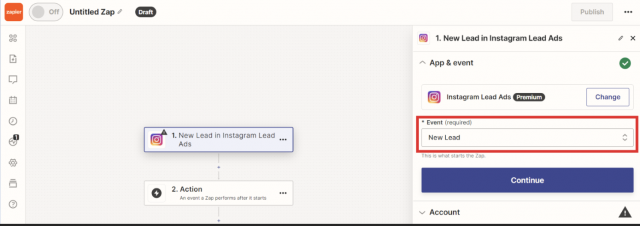
- Under Trigger, search for the platform you wish to integrate (e.g., Instagram Ads).
- Select the appropriate Event, such as New Lead, then click Continue.
- Sign into the website or social media account you want to connect.
- From the Pages dropdown, choose the page you want to integrate.
Note: If you have multiple pages, you’ll need to create a separate Zap for each one.
From the Form dropdown, select the contact form you want to integrate.
Note: If your page has multiple forms, you must either create a separate Zap for each form or select “Default (any form)” to capture all submissions.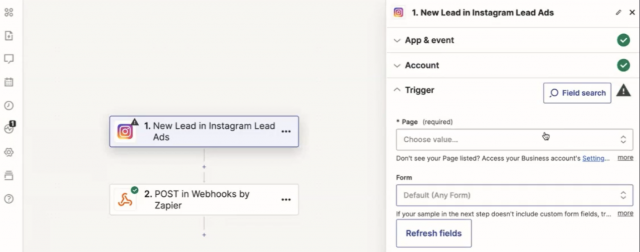
- Click Test Trigger to confirm the connection.
- Once the test is successful, click Continue with selected record.
- Under the Post section, select Continue to proceed to the next step.
Step 2: Data Variable Setup
When setting up your Zap to send data to MyMedLeads, it’s important to use specific Variable Names under the Data section of the Zap. These names allow our system to correctly identify and process each piece of information. For example, you must use FirstName for the lead’s first name and EmailAddress for their email address. Only the Variable Names provided by MyMedLeads should be used—this ensures our servers can accurately locate and process fields like FirstName, LastName, FullName, EmailAddress, and others.
Minimum set of fields required
While most variables are optional, we do require a minimum set of fields to ensure proper lead capture. The full list of supported Variable Names is included in the final section of this document and should be referenced when mapping your data in Zapier.
- Transaction Key (see above under Website Integration Requirements for where to find this)
- FirstName and LastName or FullName
- At least one piece of contact info (phone1 or phone2 or emailaddress)
Test before Publishing
You can select Retest Step to send dummy data to MyMedLeads. Once the test is received you can select Publish.
Variable List (please note the absence of spaces)
- FirstName
- LastName
- FullName (optionally used if First and Last are not available)
- EmailAddress
- Phone1
- Phone2
- StreetAddress
- City
- StateName
- PostalCode
- DateOfBirth
- Comments
- IsMale (please send in ‘true’ or ‘false’)
- ProcedureData (this can be the Name of the Procedure)
- Note: It is required that you spell the name of the procedure exactly like it appears within MyMedLeads. Alternatively, you may pass in our proprietary Procedure Id (you must request this from the MyMedLeads support).
- ReferUrl (optional, URL pointing to what leads to your form)
- Note: If you are setting this up for Facebook Ads. Then include the “ReferUrl” with the value “ads.facebook.com.” This will capture the Leads as PPC/Facebook Ads.
- Captcha (optional, will turn OFF MyMedLeads SPAM filters. Set to ‘true’)