
Account Settings
Why aren’t my patient review emails going out?
- Schedule and complete a separate appointment for any consult or surgery/procedure you document in MyMedLeads.
- If you use Appointment Type Surgery when you schedule the appointment, choose Procedure Complete in the Scheduled funnel layer.
- If you use any other Appointment Type when you schedule the appointment, choose Consult Complete in the Scheduled funnel layer.
- Don’t update a single appointment to Consult Complete and then Procedure Complete.
- Don’t update a Surgery/Minor Procedure appointment to Consult Complete or vice versa.
- Be sure to choose the correct appointment type (in this case, one that is considered a Surgical or Non-Surgical procedure)
- Be sure that the Provider name is correct. Your reviews might be set up for only specific providers.
- By default patient reviews go out after you complete a Surgery/Minor Procedure type appointment. If the appointment completed was another type, it will not trigger a review. If you think your reviews are set up to go out for other appointment types, or if you want to change those settings, contact Support at 866.858.6785.
- There may be a waiting period for emails to go out. The default setting is seven days after a non-surgical or medspa procedure is complete and 30 days after a surgery.
- There may be a rule about how often you can send reviews. The default setting is to send only one review during a six month period regardless of how many procedures are done during that time.
- The patient received the email but didn’t choose to rate or comment. This will be true for most patients.
How can I be informed of new leads coming into my account?
Yes. You are able to configure your User Account to notify you of new incoming Leads. In order to do this you will need to login to MyMedLeads, navigate to Preferences -> Manage Staff/Locations.
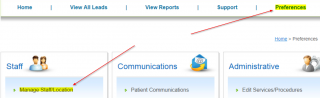
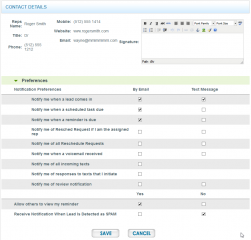
On this screen you may click on Edit next to your name. On that screen you will need to select Edit Preferences in the bottom right corner. On that Preferences screen you may toggle the different notifications.

You may learn more about User Preferences Here.
How do I setup MyMedLeads user notifications?
- Go to Preferences> Manage Staff/Location
- Click Edit next to the user you want to add notifications for
- At the bottom right of the page, click the Set Preferences button
- Check/uncheck Notification Preferences as you like and click Save.
How do I reassign a Lead to a co-worker?
Our Reassign Leads feature makes it easy to assign leads to different staff members in your office. On the Lead Management page, you will see a button called Reassign below the lead’s demographic data and procedures.

To forward the lead to another rep to be managed, simply click on this button from the lead management page and a popup screen will appear.

From the User drop down menu, select the staff member that you wish to reassign the lead to and add any additional comments in the Message box. You can also choose to be notified after a specified time period if the lead has not yet been contacted. When you are finished, simply click Proceed and the Lead History will be updated to reflect the reassignment. The user will be notified that there is a new lead waiting for them.

How to set up a From number for two-way texting
Here’s how to create a From number to be used with two-way texting. You can set up one number to apply to all of your locations, or a number for each of your locations.
- Go to Preferences> Edit Lead Sources and create a new lead source “Texting-Outbound.”
- Go to Preferences> Phone Number Management.
- Create a new phone number for the desired area code.
- Be sure the forwarding number is a real number at your practice in case the person calls back instead of texting.
- Use Lead Source – Texting-Outbound (note: it may take up to five minutes for your new lead source to be available to select).
- Turn On “Enabled Text/SMS:” and select the location from the drop down menu
- Click Create. Sometimes you’ll get pop-up errors at this point but you can ignore them and click past them.
- Refresh the page to confirm your number has been added and it has a mobile number icon next to it.
How do I set up new user accounts?
- Go to Preferences> Manage Staff/Location
- Click Add User button in the User section (not the Provider section)
- Fill out all required info. Set up a temporary password but don’t share it w/the new user
- Click the Client Login button at top right of page
- Click the Reset Password link to have an email sent to you to set up a permanent password only you know.
- Log in to MyMedLeads at https://crm.mymedleads.com/ and log in for first time w/your permanent password.
How do I know if someone has responded to a two-way text?
Set up a tracking phone number for a lead source
Configuring a personal signature for emails sent via MyMedLeads
Configuring a personal signature for emails sent via MyMedLeads
To setup a personal signature on outgoing emails that are sent on your behalf from MyMedLeads, you would need to follow these easy steps. First please navigate to Preferences -> Manage Staff/Location screen.
On this page you will need to click on “Edit” next to your User Name. On this screen there is a “Set Preferences” button on the bottom right of the screen, click that.
At the top right corner, you are provided a simple WYSIWYG HTML editor. You can style your basic signature there. If you want to incorporate images into your signature, it will be required for you to host this image elsewhere (such as your primary website). Within the WYSIWYG editor, you can add an image reference to that hosted image and set the size accordingly.
Steps for adding image content to your signature
To use an image on your website, locate the desired image, right-click on it, and select “Copy Image Address.” Alternatively, ask your webmaster for the link to any image they have hosted, even if it’s not currently displayed on your site. For the best results, link to an image that is the same size or very close to the size you want to use in your signature.
- From your MML user profile, locate the Signature field and click the Insert/Edit Image button (looks like a tree).
- On the General tab, paste the image URL and add a title and description.
- On the Appearance tab, adjust the sizing and alignment as needed.
- Click the Insert button.
- Save your signature content.
To edit the image size or position later, select the image with your mouse and click the Insert/Edit Image button. This will take you back to the Appearance tab, where you can make changes. Once finished, click the Update button.
Appointment Reminders
Can I cancel a scheduled appointment reminder?
Patient Communication Options
Patient Communications (appointment reminders)
- Initial Notification: This message is sent out immediately after an appointment is scheduled. The appointment details are included and the ability for the patient to add the appointment to his/her calendars.
- Email Only – no texts
- NOTE: This is sent for EVERY appointment scheduled. So, if a patient schedules multiple treatments on different days at the same time, they will receive this notification for each appointment at the time it is scheduled.
- Rescheduled Notification: If an appointment is rescheduled then this message will be sent to the patient. It will include the new details of the appointment and allow the patient to add the appointment to his/her calendars.
• Email Only – no texts
3. Canceled Notification: If an appointment is canceled then this message will be sent to the patient.
- Email Only – no texts
- NOTE: If the appointment is canceled after the appointment date/time has passed, no
cancelation email will be sent. The cancelation email is only sent if the appointment is still pending for a future date.
*You can choose one of the following Reminders, but both cannot be on for you at the same time.
1. Reminders only: This message is scheduled to go out with a configurable amount of time before the appointment start time. The communication includes the details of the appointment including a Google Map link (email only).
a. This can also include a text reminder that will read as follows:
Appointment Reminder: You have an appt. With “location name” on “date” at “time” AM/PM.
2. Reminders with Patient Confirmation: This message is scheduled to go out with a configurable amount of time before the appointment start time. The communication includes the details of the appointment including a Google Map link (email only). This communication does include a CONFIRM button that allows the patient to confirm the appointment. Reps are notified via email/text of when a patient requests a reschedule. MyMedLeads also offers an Appointment Confirmation dashboard under View Reports.
a. This can also include a text reminder that will read as follows:
Appointment Reminder: You have an appt. With “location name” on “date” at “time” AM/PM. Reply ‘c’ to Confirm.
How to decide the sender for Appointment Notifications and Reminders
For independent accounts using MyMedLeads for scheduling:
- Appointment notifications and reminders come from the user (assigned Rep) for the lead that was scheduled
- If you schedule an appointment for a person who is not assigned to you, the appointment notifications and reminders will come from the assigned rep and not you
For integrated accounts using their EMR for scheduling and MyMedLeads for appointment notifications and reminders:
- Scenario 1:
- Lead is created in MML and assigned to user Jane Doe
- The lead is converted to a patient in the EMR and scheduled in the EMR
- The appointment notifications and reminders will come from Jane Doe
- Scenario 2:
- An existing patient already has a record in the EMR and is scheduled in the EMR
- The integration creates a new record in MML but does not know which user should be assigned, therefore, a Default EMR Rep is selected as the assigned rep
- The appointment notifications and reminders will come from the Default EMR Rep
- Who is the Default EMR Rep?
- You can use any existing MML user or create a generic user such as “Wilson Plastic Surgery / info@wilsonplastic.com”
- Where is the Default EMR Rep set or edited?
- Go to Preferences > PMS/EMR Preferences
- Choose one of your MML users to be the Default EMR Rep
Appointment Reminders and Weekends
You can choose whether to send appointment reminders on weekends for either email or text
|
Appointment day
|
3 days before
|
2 days before
|
1 day before
|
|
Monday
|
Friday |
Saturday
|
Sunday
|
|
Tuesday
|
Saturday |
Sunday
|
Monday
|
|
Wednesday
|
Sunday
|
Monday
|
Tuesday
|
|
Thursday
|
Monday
|
Tuesday
|
Wednesday |
|
Friday
|
Tuesday |
Wednesday
|
Thursday
|
|
Saturday
|
Wednesday
|
Thursday
|
Friday
|
Weekend sending OFF
| Appointment day | 3 days before |
2 days before | 1 day before |
| Monday | Friday | Friday | Friday |
| Tuesday | Friday | Friday | Monday |
| Wednesday | Friday | Monday | Tuesday |
| Thursday | Monday | Tuesday | Wednesday |
| Friday | Tuesday | Wednesday | Thursday |
| Saturday | Wednesday | Thursday | Friday |
Here’s what happens when patients receive a text appointment reminder
How can I manage patient appointment reminders?
- Go to Preferences and select Patient Communications from the middle column.
- In the Appointments section, decide whether notifications and reminders should be set, and by what communication method.
- For notifications, select On or Off to send an email to the patient when you schedule, reschedule or cancel an appointment.
- For reminders, you can send them either with or without the option for the patient to respond to confirm. Be sure you are making selections on the row representing your choose. Everything on the other row option should be set to Off. You can also set everything on both rows to Off so that no reminders will go out.
You also have options to send these reminders via text and automatic voicemail as well as email. Select On or Off next to each communication type. At least one option should be set to On.
- Click the Save button at the top of this page.
- Click the Manage button to open the Reminder Scheduling Details page to determine when reminders should be sent. Be sure to make selections for any communication type you set to On. Notice that you can configure text/voice reminders to have either the same or different timing as email reminders.
- Set up either a Fixed (same for all appointments on a given day) Time or a Fluctuating time (timing varies based on specific appointments on a given day).
- Configure the specific timing for the Fixed or Fluctuating reminder.
- Click the Save button
- Go back to Preferences> Patient Communications to double-check your settings.
How to know if a patient has canceled or asked for reschedule.
- You can get an individual notification for each request. Go to Preferences> Edit Staff Preferences and be sure both Notify me of Resched Request and Notify me of Resched Request if I am the assigned rep are checked.
- You can see all of the requests for a given day at View Reports> Appointment Confirmation report. The drop-down next to the patient’s name will show if/how s/he responded to the confirmation mes
Managing patients’ appointment reminders
- Go to Preferences and select Patient Communications from the middle column.
- In the Appointments section, decide whether notifications and reminders should be set, and by what communication method.
- For notifications, select On or Off to send an email to the patient when you schedule, reschedule or cancel an appointment.
- For reminders, you can send them either with or without the option for the patient to respond to confirm. Be sure you are making selections on the row representing your choose. Everything on the other row option should be set to Off. You can also set everything on both rows to Off so that no reminders will go out.
You also have options to send these reminders via text and automatic voicemail as well as email. Select On or Off next to each communication type. At least one option should be set to On.
- Click the Save button at the top of this page.
- Click the Manage button to open the Reminder Scheduling Details page to determine when reminders should be sent. Be sure to make selections for any communication type you set to On. Notice that you can configure text/voice reminders to have either the same or different timing as email reminders.
- Set up either a Fixed (same for all appointments on a given day) Time or a Fluctuating time (timing varies based on specific appointments on a given day).
- Configure the specific timing for the Fixed or Fluctuating reminder.
- Click the Save button
- Go back to Preferences> Patient Communications to double-check your settings.
No-shows for appointments
- Independent MyMedLeads accounts (those not integrated w/an EMR) can manually mark an appointment No Show in the Scheduled layer of the funnel. If the No Show notification is ON, patients will receive it automatically.
- For MML accounts integrated w/an EMR, you don’t use the Scheduled tab to update appointment status. MML relies on status updates received from the EMR in the integration message. Any manual updates to status made from the funnel will be overwritten by the integration message.
MML rarely receives a No Show status from an EMR. Most EMRs will send us a Canceled status whether you mark a patient No Show OR Canceled in the EMR. This means the No Show appointment notification will never be triggered / sent.
- Unlike other appointment notifications and reminders, the No Show notification is currently not customizable. You can only turn it OFF or ON at Preferences> Patient Communications. By default, it’s OFF. Most of our clients have not liked the default No Show notification.
You *can* customize the Cancel notification to include language that indicates a penalty if the person canceled with not enough notice (per your cancelation policy) or didn’t show. Ask MyMedLeads support if you are interested in pursuing this option.
We use a surgery center and do not always have the correct start time of our procedures. Can we still use appointment confirmations and reminders within MyMedLeads?
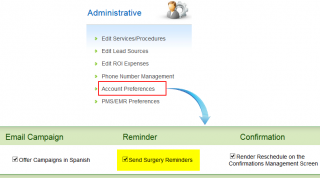
Yes. The MyMedLeads Platform can ignore all appointments that are marked as Surgery when sending out appointment confirmations and reminders. This can be controlled within your account by navigating to Preferences -> Account Settings (you must be logged in as a Doctor of the account to see this link).
Once on that screen, towards the middle you will see a checkbox labeled “Send Surgery Reminders”. If you would like our system to not send out confirmations and reminders for Surgeries then make sure that you deselect this checkbox.
You can learn more about Appointment Confirmations and Reminders Here
Who is the sender for appointment notifications and reminders?
How can MyMedLeads help me minimize “no shows”?
MyMedLeads does three things to ensure that patients show up to their appointment.
- We send an immediate confirmation to your patients. This email we send comes with a link that makes it easy for them to add their appointment to the calendar of their choice: Outlook, ICal, Yahoo or Google
- The day before the appointment, we send a map from their home to your practice with directions and estimated time to arrive.
- The morning of the appointment, we send a text message reminder to their phone (as long as they agreed to it when you scheduled them.
Patients who do not show up for their scheduled appointments cost you both time and money. Numerous studies have actually shown that implementing SMS & email appointment reminders can reduce “no shows” by up to 80%. By simply adding this one cost-efficient solution, medical practices can recoup potential lost revenue and greatly increase the efficiency of care delivery.
Call Tracking
How do I use two-way texting?
- To set up a new From texting number, follow these instructions.
- To use an existing number
- Click the Edit button next to the number so that the top of the screen populates the settings for that number.
- One of the settings is an option to “Enable Text/SMS”. Turn this ON and select the Location that will serve as the From text number.
- Be sure to click the Create or Update button to save your changes.
- Open a lead and click Send Text.
- Select the From location
- Type your text content.
- Click Send Text again.
- The lead’s History tab shows whether the response was Consent or Declined.
- The Text History tab shows all sent and received messages.
When you get no response to your first two-way text
- First, just type another message into the box and click Send Text. Do not click the Resend Consent Request button. Then you wait up to 24 hrs. If no reply / nothing changes, then almost certainly (a), (b) or (c) is the issue, which you can’t control.
- If you get an error message when you try #1 that you are not allowed to text the person w/out consent, that’s when to try clicking Resend Consent Request button. Don’t try sending a new message or clicking Send Text. If you still don’t receive a person’s consent and you still get an error when you try #1 again, click Support> Submit a Ticket or call us at 866-858-6785.
Marketing Campaigns
Moving MML emails to a new platform
To switch your email to a new platform:
- Open the email in Preferences > Communication Builder.
- Click on the email name
- Select the first email you want to recreate on the new platform.
- Click the HTML button (<>) to display the email’s HTML code in a pop-up window.
- Copy the entire HTML code.
- Exit the pop-up and the email.
- Go to your new platform and paste the HTML code (you’ll need to confirm the process for adding the code with that team).
Set up an emergency alert to send quickly to everyone
- Create the message in Preferences> Communication Builder.
- At Preferences> Campaign Builder, Create a Newsletter/Blast type campaign named “Bad Weather” or similar
- Save, and you’ll be taken to step 2 of the open campaign.
- Step 2 Audience – make no change. Everyone will be included. Click Next Step
- Step 3 Message – click and drag the Email button into to the white space. Choose the email you made in Communication Builder. Set a date to send it.
- Step 4 activate the campaign and send the message.
- 2-3 days later, go to Preferences>Campaign Builder and deactivate the campaign.
- Create or edit the message in Preferences> Communication Builder.
- Go to Preferences> Campaign Builder, get into your Bad Weather Campaign and go to Step 3.
- Drag the new message into the white space under the old one. Set the delivery date.
- Activate the campaign and Send
Email images are not rendering for recipients who use Gmail.
Gmail has recently updated its security settings, which may impact the display of images in emails sent from MyMedLeads to Gmail addresses. Previously, users could either download email images via right-click or have their Gmail settings allow images to display without right-clicking.
However, with the new security setting, some images may be completely blocked, with no option to right-click and display them, regardless of the user’s Gmail image settings.
MyMedLeads has found that this issue tends to occur when using images that were directly uploaded from your computer. If the image filename contains spaces, Gmail will not display the image.
Additionally, locally uploaded images may cause problems in Gmail for other reasons. To avoid these issues, use a URL image address (link) to a hosted location when adding images to your emails. This will help prevent the Gmail problems from occurring.
To ensure proper image rendering in Gmail, please make sure that your Hosted Image Names and Directories do not contain any spaces.
Resending a message from an email blast
Best practices for timing procedure marketing campaign messages
- You stand a better change of making sure the right people get into the right campaign audience
-
Your leads will receive tailored information about their Procedure of Interest and a clear call to action (schedule an appointment) that doesn’t overlap with your staff’s direct communication efforts to acknowledge new leads and schedule new patients.
-
Also important: email campaign messages do not change lead status from New to Follow-Up and are not included in the calculation of Average Response Time statistics on the Conversion and Activity reports.
- If you are only using the Default campaign and targeting people based only on Status (New and Follow Up) but not on Procedure of Interest, a same-day acknowledgement / ‘autoresonder’ makes sense.
- If you are using one or more procedure-specific campaigns along w/the Default campaign and you feel strongly about the first message going out the same day, MyMedLeads recommends using an identical and generic initial acknowledgment email in every procedure campaign. The first procedure-specific message would go out 3-5 days after the initial acknowledgement, by which time several people may have already been scheduled or their Procedures of Interests verified.
Using content from Email Templates in Communication Builder.
- Open the email in Preferences> Email Templates
-
Click the HTML button on the right side of the formatting menu (Bold, Italics, etc).. The HTML code for your email will display in a pop-up window.
-
Select and copy all of the HTML code
-
Cancel out of the pop-up and the email.
-
Go to Preferences> Communication Builder and click Add Email button
-
IMPORTANT: Choose For the traditional WYSIWYG Editor. Please Click Here at the top of the page (don’t choose a template)
-
Click the HTML button
-
Paste the HTML code
- Save the email.
Campaign Builder: Quick Overview
Types of Campaigns
All campaigns require mapping and necessary actions within the account. Text campaigns may incur an additional fee based on the number of messages sent.
Procedure Marketing – Best Practice Option: This targets the highest volume of procedures by grouping procedures into one category or campaign (e.g., facial services, body services). The campaign will run until a lead schedules a consultation.
Newsletter/Specials/Blast – This is a one-time email sent to all leads and patients, regardless of their status. It can feature a one-time special, a weather notice, or general office updates (such as new hours). Avoid stacking messages in the newsletter or blast; it’s best to schedule them individually.
Recall – This type of marketing targets patients who have received a procedure, such as Botox, but have not scheduled their next appointment. They will continue to receive this campaign until they book their next Botox appointment. Patients must have completed a previous appointment. The recall campaign can be set for 30 or 90 days.
Birthday – Birthday messages will be sent to all patients based on the settings you establish.
Post-Consultation -These follow up on the procedure campaign and should be stacked similarly to procedure campaigns.
Pre-Operation – For these campaigns, it’s essential to know the specific procedure. Pre-operation campaigns function in reverse order.
How to use a URL link to externally hosted images in MML email content
You can use images in MyMedLeads in the following places by linking to the image via the URL to a hosted location.
- The Signature in your user profile (Preferences> Edit Staff Preferences)
- Individual emails you create at Preferences> Email Templates
- Group/marketing emails you create at Preferences> Communication Builder (note: in this tool you can also upload images directly from your computer, but linking to hosted images tends to work better for all email software (gmail, outlook, etc.).
Don’t know how to link to images? Don’t know where you can put hosted images?
- Click the Images icon (looks like a picture of a tree)
- Paste the URL for the hosted image. It’s probably something like https://yourwebsitestuff.com/assets/images/NameOfYourImage.jpg
- Drag the Image component into your content
- On the right panel, click Jump to Gallery
- Choose the Image from URL tab
- Paste the URL for the hosted image. It’s probably something like https://yourwebsitestuff.com/assets/images/NameOfYourImage.jpg
How to edit messages in Preferences> Email Campaigns
- Go to Preferences> Email Campaigns
- Click the “x emails” link under the campaign icon
- Expand the email you want to edit (you may have similar emails across your campaigns to be sure to check there too)
- Uncheck the Activate box
- Make your changes. Be sure to Save at every opportunity.
- Send yourself a test email and make any final edits.
- Check the Activate Box and Save one last time.
- Go back to #3 and repeat for other emails.
Campaign strategy for targeting old leads
- You can add message(s) to your Procedure marketing campaigns as far into the future as you like. Let’s say you already have campaign(s) that automatically sends message(s) to leads when they first inquire; for instance, message 1 on the first day, message 2 five days after message 1, message 3 two weeks after message 2. Some leads never schedule anything and you’d like to follow up in one year. Create message 4 and schedule it to go out twelve months after message 3. You can even send a whole new series at that time, with message 5 going out five days after 4, etc.
- Use Outbound Call Reminder elements right after key messages to automatically create tasks on your staffs’ dashboards. These could be triggers to add notes or just pay special attention to the leads at certain points. In our example above, we’d add one outbound call reminder a day after message 3, and another a day after message 4.
- When a person has received the first three messages, the task can prompt you to identify which leads will be targeted to receive the future follow-up messages. (1) Add a Staff Comment to leads identified as potential 1-year follow-ups; (2) Disqualify all other leads who have reached this point.
- When the 4th message is received, the task can be to re-engage the person directly or update the lead in MyMedLeads a certain way, or just a heads-up for your staff.
How do I replace an existing image in a campaign email?
- Go to Preferences> Communication Builder
- Click the name of the message you want to edit.
- Click the image you want to delete and click the Delete button on the top right of the page editing area.
- Drag an image component to the section you just removed the old image from. On the right side, you’ll see image properties appear.
- Click Jump to Gallery. You can upload an image directly from your computer, but if the image already exists on your website, copy/paste its URL:
- Find the image on your website
- Right-click it and choose Copy Image Address
- Return to the Gallery and be sure you are on the URL tab. Paste the image URL into the space and save.Now it will be available to insert
- You’ll notice that MML will resize the image to fit the space you dragged it into. You can use the size slider to adjust if you like
What time frame is recommended for setting up automated emails?
MyMedLeads has seen success in the following scheduled timing and highly recommend that first touch be a manual email/text/call made by your staff.
Email #1 – 3 days from lead posted
Text #1 – 2 days from last event
Email #2 – 5 days from last event
Email #3 – 2 weeks from last event
Outbound Call Reminder – 1 month from last event – “Prospect has received all automated messages. Time to follow up.”
How to deactivate a Campaign you no longer wish to use
- Navigate to the Preferences section.
- Click on the Campaign Builder.
- On the right side, locate the name of the campaign you wish to deactivate.
- Click on that campaign name.
- On the left side, you will see “Save,” “Deactivate,” and “Next Step” buttons.
- Click the “Deactivate” button.
- A pop-up will appear, asking if you want to deactivate the campaign. Click “OK.”
- The campaign is now deactivated.
- Repeat steps 3-7 for any other campaigns you need to deactivate.
How do I setup a Post Consult campaign?
- See section 7 of the Communication Builder User Guide on mymedleads.net for drag-and-drop instructions
- See this Knowledge Base article about adding images to MML content.
- The message(s) will be timed to go out at specific intervals starting w/when they are Consult Complete.
- For each message, click and drag the email button into the white space and configure the timing.
- You may decide that if someone receives all messages from this campaign and never schedules the procedure that you want to try the patient once last time by phone. Click and drag the Outbound Call task element to the last step in the flow to trigger a task for you, the MML user. Be sure you have reminder and task notiifications turned on in your User Profile (Preferences> Edit Staff Preferences).
- Go to View All Leads
- In the blue filter bar set Status=Contacted.
- Click the blue triangle in the column heading “Posted Date” to see the oldest records first.
- Open a lead to delete one record, or click the checkboxes on the right-most coluimn of View All leads
- Click the Delete button, choose Disqualify and select the Business reason closest to your purpose.
- Repeat this process with all of the other Status filters, focusing on old leads that will have a small or no chance of becoming new or returning patients.
Campaign Email Tips & Tricks for Beginners
Here are some frequently provided recommendations for customers as they familiarize themselves with Campaign Builder and Communication Builder.
There are two types of automated emails you can create within MyMedLeads
Drag-and-drop editor: Refer to our Communication Center User Guide, which comprehensively covers the functionality of the drag-and-drop editor in the Add Templates and Add Email sections.
WYSIWYG (basic) editor: This stands for What You See Is What You Get.
- While utilizing Communication Builder, you can click the Campaign Builder button to open two browser tabs, facilitating easy navigation between Communication Builder and Campaign Builder. Similarly, selecting the Message Builder button from the Campaign Builder interface will yield the same result.
- When generating a new email from a template, it will always utilize the latest version of that template. However, if you modify a template after creating an email based on an earlier version, the existing email will not reflect those changes.
- The term “Active” next to an email or text in Communication Builder indicates that it is available for use within a campaign. It is important to note that messages cannot be sent directly from Communication Builder; they must be part of an active campaign.
- If you modify a message that is currently in use within an active campaign, there is no need to alter the campaign itself, as Campaign Builder automatically references the most recent version of the email.
- Should you need to adjust the parameters of an ongoing drip campaign—such as the audience, the messages included, or the timing of those messages—ensure that you deactivate the campaign, implement the necessary changes, and then reactivate it.
- In the context of drip campaigns, you may incorporate an Outbound Call Reminder at the conclusion of your message list (campaign Step 3) to track whether an individual has received all campaign messages without scheduling their initial appointment. This will generate a reminder on your Home page task list, allowing you to take appropriate actions, such as making a final personal call or email, or disqualifying the lead.
Trying to launch a last-minute campaign?
-
Click the green “Create New Campaign” button.
-
On the right side of the screen, type your campaign name (the sample name will disappear as you type).
-
Choose the campaign type: Newsletter, Specials, or Blast.
-
Click “Save.” You’ll be taken to the “Select Audience” screen. Make no changes to the audience – everyone will be included. Click “Save,” then “Next Step” to proceed to the “Choose Message” screen.
-
Click and drag the “Email” or “Text” button into the empty space. Choose the message you created in the Communication Builder. Set a date to send it, then click “Save.”
Do not use the “Test Campaign” button. Instead, you can test your email or text by opening it in the Communication Builder and entering your email address at the bottom of the screen to send a test version.
On Step 4, click the green “Activate” button. Your message will begin sending at your chosen date and time.
To review the progress of your campaign, go to the Campaign Report under the View Reports section. Please note that if you have a very large audience, it may take a few hours before you see activity reflected in the report.
Small tips for minimizing issues with your email being sent to spam:
Send relevant content
The foundation of a successful email program is a commitment to sending your recipients content that is both relevant and engaging. This requires intentionality – simply sending emails for the sake of sending will only hurt your engagement. Aimless, irrelevant emails risk being ignored or even marked as spam. Instead, focus on crafting emails that genuinely resonate with your audience.
Avoid trigger words or misleading subject lines
Certain phrases, such as “earn extra cash” or “increase sales,” can inadvertently trigger spam filters, regardless of your original intent. To ensure your messages reach their intended recipients, pay meticulous attention to the wording you use, from the subject line to the body of the email.
Ask your subscribers to add you
Encourage new subscribers to add your email address to their approved contact list, or “primary tab.” This helps ensure your emails are delivered to their inbox instead of the spam folder. When subscribers include you on their approved senders list, it sends a trust signal to email providers like Gmail and Apple Mail, which can lower your overall spam score.
Forego attachments
Avoid attaching documents, coupons, or other content to your emails. Attachments can significantly slow down email downloads and often cause messages to bounce or end up in spam folders. Instead, include a link or call-to-action button that directs subscribers to a dedicated landing page where they can access that additional content.
Avoid using too many photos and not enough text content
Spam filters may block emails with an abundance of images, and some email providers disable images by default, potentially making image-heavy content inaccessible to recipients. To ensure your message is received as intended, it’s best to avoid relying solely on images. Instead, follow these image-related best practices:
- Provide alternative text (alt text) descriptions for all uploaded images.
- Limit the number of images in your email to three or fewer.
- Test your emails containing images across different email clients (such as Gmail and Yahoo) before sending to your full contact list, to confirm the images display properly.
How does a lead’s procedure selections affect marketing campaigns?
When we configure a set of email campaigns to go to an audience of only those interested in a procedure, MML will be looking at the Procedure field of the lead to determine which campaign audience to assign.
When you get leads from Contact Us or similar forms on your website, the Procedure field in MML can be mapped by your webmaster to a selection someone makes on that website form. If there is no such mapping, then any information from the form is captured in the Patient Comments section. In that scenario, the person would be assigned to the Default (generic version) campaign until/unless someone manually updated the Procedure field.
Add a temporary new lead auto-responder during holiday hours
- Click the Add Email button
- Right underneath the Email Message title use For the traditional WYSIWYG Editor. Please Click Here.
- There are many FAQ articles available for creating content; click Support> Knowledge Base to see them. Just keep things simple and you’ll be fine.
- Find and click the Default campaign under Procedure Marketing.
- Click Next until you get to the drag-and-drop screen.
- Click and drag the Email button into the white space. A pop-up will appear.
- Choose your message and timing (for example, you can send it one hour after a lead is posted).
- Click OK and click Save at the bottom of the page. You’ll be taken to the last step of the setup.
- On the left, click the green Activate button. You’ll see a message about it taking up to eight hours to query the database. Don’t worry about it.
- Go back to Preferences> Campaign Builder and be sure your Default campaign now has a green icon next to it and says Active.
- Go to Preferences> Campaign Builder
- Find and click the Default campaign under Procedure Marketing.
- Click the orange Deactivate button
- Go back to Preferences> Campaign Builder and be sure your Default campaign now has a red icon next to it and says Pending
How to add a clickable button to a Communication Builder email
- Click the name of your email message to open it.
- Click and drag the Button element to the desired position.
- Double-click to add text to your button.
- In the Button panel to the right of the message you can choose color, font, alignment, etc
Getting started with Email Campaigns
- Go to Add Templates to see the Procedure Marketing Templates that have been done before or to add your own.
- Once your template is finished, go to Add Email. You can select your template and just make a few changes for that particular email. NOTE: if you change your template, any emails you previously created from it will not change.
- Check out the Communication Center User Guide on our help site http:mymedleads.net. for instructions and tutorials on the drag-and-drop editor.
- Click Create Campaign, name your campaign and select the campaign type.
- For more details on the different kinds of campaigns, see the Marketing Campaigns section of mymedleads.net,
How a lead’s procedure selections affect marketing campaign audiences
When we configure a set of email campaigns to go to an audience of only those interested in a procedure, MML will be looking at the Procedure field of the lead to determine which campaign audience to assign.
When you get leads from Contact Us or similar forms on your website, the Procedure field in MML can be mapped by your webmaster to a selection someone makes on that website form. If there is no such mapping, then any information from the form is captured in the Patient Comments section. In that scenario, the person would be assigned to the Default (generic version) campaign until/unless someone manually updated the Procedure field.
This is a partial screenshot of a lead in MML showing the Procedure and Comments fields.
This is an example of a set of procedure-based campaigns, including a Default one.
How do I choose From/Reply-to in Campaign Builder emails?
- Click your campaign name to open it. If your campaign is active, click the Deactivate button, refresh your screen and click the campaign name again.
- Click Next Step until you are on Step 3 Choose Messages.
- Click and drag the Email button into the big grey space. A pop-up appears for you to select the email you want from Communication Builder.
- Send to Assigned Rep defaults to Yes; if you would rather everyone get the same Reply-to address click No and select the appropriate user.
- Save to close the pop-up window and repeat #3-5 for any other emails you add to this campaign.
- Save the screen to go to Step 4 Preview & Activate.
- When you are ready, click the Activate button on the left.
EMR Integrations
Managing Duplicates from EMR
If your MyMedLeads account is integrated with your EMR (Nextech, PatientNow, DrChrono, Symplast, NextGen), you may sometimes see this message at the top of your Home page:
You have X possible duplicates. Please Click Here to manage them…
This message appears when there are two records for the person in MyMedLeads. One may have the original Lead Source (ex: RealSelf) and the other has your EMR as the Lead Source (ex: Nextech).
What causes duplicates:
Every time you schedule a patient in your EMR, MyMedLeads receives an update and tries to match it with an existing MML record for that patient.
If you enter new patients directly into your EMR when you are ready to schedule them, MML will try to find a person with the exact same name, email, and phone number(s) and automatically merge/match the EMR record to the one in MML, which has the trackable Lead Source.
If MML only finds a partial match, it thinks the two records are the same person but needs a human to look at them to be sure. Meanwhile, MML will create a duplicate with your EMR as the Lead Source.
- The duplicate record is not being tracked on the funnel or your conversion reports.
- The person might get more than one marketing email or incorrect appointment notifications.
How to avoid duplicates:
The best way to avoid duplicates is to always use the “Convert To” button in MyMedLeads to create
your new patient in your EMR. In other words, do not enter new leads or new patients directly into your
EMR. The two systems will immediately make a match between the two records.
This is not the same person. What do I do?
- Click the “Not Duplicate” button and you are done. MyMedLeads will never look at these two records as the same person again. This is the same person. What do I do?
- Click the “Merge” button to combine the two records into one.
Data MyMedLeads will keep when merging 2 patients:
Here are the basic rules. The table below shows which fields would be kept if we merged the example.
- Post Date – oldest date
- Name – most recent name
- Phone – if one field is blank, the non-blank number. otherwise most recent phone
- Phone2 – if one field is blank, the non-blank number. otherwise most recent phone2
- Email – if one field is blank, the non-blank email. otherwise most recent email
- Status – the status farthest along (ex: Consult Complete beats Follow Up)
- Lead Source (not shown on Merge screen) – the trackable lead source
Converting leads from MyMedLeads into patients in NexTech
When a lead or a call gets posted to MyMedLeads, go to the lead management page and click on Convert to NexTech. The patient demographic information is immediately available in NexTech so that you can schedule them from within NexTech.

Leads Are Not Converting to Nextech
While configurations are normally the cause of the issue and would require a support ticket to be opened, one common scenario is that there is no Default Location selected within Nextech.
Check Default Location
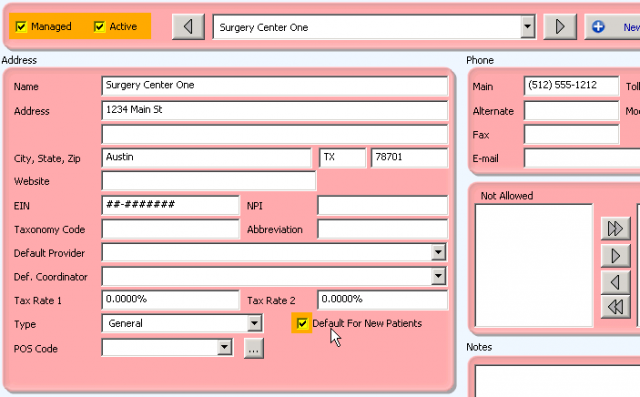
A default location within Nextech is required for new leads to be generated from an HL7 interface (such as MyMedLeads). To do this (or to check this) is very easy. Within Nextech go to Gold Key marked Admin—the first tab Locations. On the Locations Tab, there is a dropdown to select the Location and within the address box you see a checkbox labeled ‘Default for New Patients’. One of your locations must have this checkbox selected, otherwise the Leads will be batched to the HL7 Tab (under Links). From there you would have to import the Lead manually.
After selecting one of the checkboxes
If this does not appear to be the issue, then it is possible that we may need to restart your Plugin or troubleshoot this further.
How to install the NexTech plugin for MyMedLeads
Step 1. Please contact your practice management rep to ensure that they enable HL7 and that you have the latest version of your software. This will allow MyMedLeads to integrate with your PM software.
Step 2. Once they setup your account, please email us at support@mymedleads.com so that we can send you the link to the plugin.
Step 3. When you receive the link, installing takes less than 4 minutes. At the end of installation, you will be prompted for an activation code that we will provide. Simply follow that link from the server that hosts your PM/EMR and enter the activation code when prompted.

Once the software is installed, Your NexTech and MyMedLeads accounts will be fully integrated so you will no longer have to enter leads into NexTech manually.
Preventing Duplicates in your EMR Software
MyMedLeads can only manage duplicates coming from your EMR Software. However, when a patient is converted from MyMedLeads to your EMr, it becomes their responsibility to manage and merge any duplicate patient records. If your EMR software fails to do so, it will result in the creation of a duplicate patient record.
To properly manage the data when a patient is ready to schedule, follow these best practices:
For a NEW patient in MyMedLeads but not yet in your EMR software:
- In MyMedLeads, select the “Convert to” button.
- In your EMR software, search for and schedule the new patient.
- MyMedLeads will receive the appointment message (visible in the History section of the lead) and change the status to “Scheduled” in MyMedLeads.
For an EXISTING patient already in your EMR software:
- From your EMR software, search for and schedule the patient.
- Do not click the “Convert to” button in MyMedLeads, as this may create a duplicate in your EMR software.
- MyMedLeads will receive the message, and then search the account for the patient record.
If the person you schedule doesn’t yet exist in MyMedLeads, a new MyMedLeads record will be created.
If the person does exist in MyMedLeads:
- MyMedLeads will merge the records if the name, email, and phone match exactly.
- MyMedLeads will flag it as a duplicate for you to merge if the information partially matches.
Scheduling patients in NexTech and how it syncs with MyMedLeads
When a patient gets scheduled in NexTech, the schedule details will show up in MyMedLeads. The lead will also move down the funnel as a scheduled patient.
Once the lead is converted to NexTech, the two systems will sync this lead so that changes that occur in NexTech automatically affect the MyMedLeads version. If the lead is converted but not scheduled, it will move from New Leads to Follow Up inside of MyMedLeads.
If the lead is converted and is scheduled in NexTech, the New Leads count will be reduced by one and the Scheduled Consultations count will increase by one as seen in the illustration below:

When a lead is scheduled in NexTech, it will automatically move down the funnel.
How do I manage duplicate leads from the EMR?
| Post Date |
Name
|
Phone
|
Phone2
|
Email
|
Status
|
Action Button
|
| 2/2/19 | John Smith |
969-888-9999
|
johnsmith@email1.com |
Follow up
|
Merge
|
|
| 2/2/20 | John Smith |
969-666-7777
|
johnsmith@email2.com |
Consult Complete
|
Not Duplicate
|
Why do I have these duplicates?
- This duplicate record isn’t being tracked on the funnel or your conversion reports
- This person might be getting more than one marketing email or incorrect appointment notifications.
- Post Date – oldest date
- Name – most recent name
- Phone – if one field is blank, the non-blank number. otherwise most recent phone
- Phone2 – if one field is blank, the non-blank number. otherwise most recent phone2
- Email – if one field is blank, the non-blank email. otherwise most recent email
- Status – the status farthest along (ex: Consult Complete beats Follow Up)
- Lead Source (not shown on Merge screen) – the trackable lead source
| Post Date |
Name |
Phone |
Phone2 |
Email |
Status |
Action Button |
| 2/2/19 | John Smith | 969-888-9999 | johnsmith@email1.com | Follow up | Merge | |
| 2/2/20 | John Q Smith | 969-666-7777 | johnsmith@email2.com | Consult Complete | Not Duplicate |
Symplast: How to find the Referral Sources in Symplast
Step 1: Log into your Symplast
Step 2: Click on “Admin” from the top navigation bar
Step 3: Click on “Integrations”
Step 4: Click on the settings Gear at the bottom of the left-hand navigation bar
Step 5: Click “Referral Sources” under the Company section
Step 6: Take a screenshot of the full “Referral Sources” page
Web Form Integrations
How do I setup my website leads to flow into MyMedLeads?
To address this request, please open a support ticket. We will need to confirm the webmaster’s contact information in order to communicate the necessary action items. Additionally, please provide the website domain(s) and any direct form URLs, as well as the lead source name you would like the site associated with.
Once a lead submits their information on your site, MyMedLeads processes and uploads that data to our servers. Whenever a visitor accesses your site, our API client tracks the referral source – whether it’s a search engine, directory, or other service – and captures the keywords that directed that visitor to your site.
MyMedLeads Captures and Manages Your Lead
Once MyMedLeads detects a new lead generated by your site. The MyMedLeads System begins working for you and allowing you to manage your lead in the best possible manner.
How can I integrate with Facebook/Instagram ads?
Facebook and Instagram Ads can be integrated with MyMedLeads using Zapier. Here is online documentation on Zapier Integrations:
https://mymedleads.net/api-documentation/no-coding-required-web-integrations/
Zapier does not offer a Business Associate Agreement to practices for HIPAA compliance purposes.
Additional fees may occur when using Zapier, so each practice must decide whether to use Zapier Integration.
Understanding RealSelf Duplicates
It’s common for RealSelf leads to create duplicate entries. This can happen when a person submits multiple consultation requests on RealSelf or accidentally hits the “Submit” button twice. MyMedLeads (MML) handles these duplicates in a specific way:
– MML will update the existing record with a new “Web Submission” timestamp.
– The updated lead will appear at the top of the “View All Leads” page, sorted by the most recent submission date.
– Instead of receiving a notification for a “new lead,” you will get a “duplicate detected” notification.
– If you check the lead that triggered the duplicate notification, you’ll find a “Create Lead” button in the History section, in case it turns out to be a different individual.
You have the option to click the “Create Lead” button next to the most recent web submission, but you only need to do this if it turns out to be a different person with the same name, such as another “John Smith.”
Our practice is listed on an online directory. Can I get those leads into MyMedLeads?
Absolutely! When you sign up to an online directory website, or your practice receives sales leads from a site that your web team does not fully control, then you can add an email address to that form submission notification chain to inform MyMedLeads of the new sales leads. This email address will be assigned to your account and can be reused for multiple directory sites.
This solution is called our Email Mapping Solution. You can read more about it: Email Mapping Solution
You and your staff will need to work directly with your Account Executive to set this up and in the above article describes the entire process of setting this up.
General Questions
Tracking more than one inquiry on an existing lead
- Your staff will receive a ‘duplicate detected’ email instead of the usual ‘new lead’ email (assuming that notification is ON at Preferences> Edit Staff Preferences).
- Your staff will see the lead in the Follow-up level of the funnel instead of the New level, in the bottom section Recently Reconnected Leads
- If your staff happens to answer a call from the lead and clicks the Enter Lead button on the funnel to start typing the person’s info, they will immediately see anyone who might match that person’s name, email or phone number, and can click Use This to open and update the existing record.
- On View Reports> Conversion Report, by default Jane’s 1st inquiry will show up on the report for any date range that includes January.
- If you check the See by Last Attribution checkbox on the Conversion Report, Jane’s 2nd inqury will show up on the report for any date range that includes April.
- For any Conversion Report that has See by Last Attribution checked, both of Jane’s inquiries will be captured for any date range that includes both January and April.
Patient has completed at least one appointment but is in the Scheduled funnel layer??
- Go to View Reports> Conversion Report and look for the row with the patient’s Lead Source.
- You can see this more clearly if you set a smaller Date Range at the top right of the screen. For this example, we can use date range Jan 1-15.
- You are now seeing everyone who came in from that lead source the first two weeks of January. Over time, people only move to the right in this report.
- If you like, you can look at the detail on the View All Leads page. Use the same date filter you did for the Conversion Report and in the blue filter bar, set Lead Source to the same one you were looking at.
MyMedLeads Cancellation Policy
Cancellation Policy
MyMedLeads requires a 30-day written notice with a brief description as to why you are discontinuing service. We greatly appreciate any feedback you can provide.
Written notice can be sent by email to support@mymedleads.com. The MyMedLeads client success manager will then reach out to finalize and guide you through the cancellation process.
Cancellation Process
- The account will be active for 30 days in accordance with the terms of the cancellation policy.
- You can export any lead data as needed.
- This will provide time to request removal of any MyMedLeads integration code from your website.
- This also allows time for you to port out any Call Tracking numbers you would like to keep. If you choose not to keep the MyMedLeads created numbers, you can simply remove the numbers from your advertisements/social media.
Reducing and Managing Spam Calls
Setting up trackable phone numbers in MyMedLeads (under Preferences > Phone Number Management) will inevitably result in spam calls, much like the unsolicited calls you likely receive on your personal lines. While there’s no way to completely prevent these nuisance calls, you can learn to identify them quickly and minimize time wasted returning bogus inquiries.
Identifying Spam Calls
If a lead’s name is listed as “Unavailable,” it does not necessarily mean the call is spam. By default, MyMedLeads records both live calls and voicemails from tracking numbers, and leaves a link to listen in the lead’s History section. Usually, you can determine the legitimacy of the caller by listening to just a few seconds of the recording. You can even obtain the caller’s real name from the recording – be sure to update the Name field accordingly.
Anyone who may receive inbound calls from trackable phone numbers should keep the MyMedLeads Home or View All Leads page open. When you answer a call, a new lead is automatically created. So if an “Unavailable” name pops up, it is very likely the person you are speaking with.
However, if the lead source is one not typically associated with inbound calls (e.g. Texting-Outbound, where the “From” number is used for two-way texting or text appointment reminders), the call is more likely to be spam.
Be Aware of The “Masking” Technique
Clients often report receiving spam calls where the person who answers claims they never called. This is a common tactic used by spammers known as “masking.” Spammers will co-opt a real phone number similar to the one they are calling from and use it to mask their own caller ID. So if your number is 555-222-3333, they may call from numbers starting with 555-222, which are real numbers. When you call those numbers back, the person who answers will say they never placed a call.
This masking technique is used by spammers across all providers (AT&T, Verizon, etc.). Our provider, Twilio, is aware of the spam issue our customers face and we regularly discuss ways they can help block these calls.
If you identify a lead as spam, you should disqualify it so it doesn’t skew your conversion numbers. Occasionally, you may call back a lead who used a trackable number to contact your practice, only to have the person who answers claim they never called. If you notice a pattern of this happening, it’s a sign the calls may be from spammers using the masking technique.
What steps can I take to reduce/manage spam calls?
-
When a call comes in from a tracked number, a new lead is instantly created in MyMedLeads and appears in the To Do list on the Home page, as well as the View All Leads page. This allows you to immediately see the business name and other lead source details. If the number is marked “Not Available,” you can open the lead and begin filling in the caller’s first name while you’re still on the call.
-
If your website uses a tracking number, consider reverting to your main practice number instead. Calls from the tracking number will create leads, even if they’re not actual sales leads (e.g. spam calls). This can result in you spending more time removing non-qualified leads from your funnel, lists, and reports.
-
As soon as you realize a lead is spam, you can click “Not Qualified” at the top right of the open lead. This will remove it from your funnel, lists, and reports. Over time, you may start to notice patterns in the “Not Qualified” leads that can help you better distinguish spam calls in the future.
-
To get an instant indication of a new lead when an inbound call comes in, consider enabling Call Whispers for your trackable numbers (in Preferences > Phone Number Mgmt). For example, if someone calls your Instagram number, you’ll hear “call from Instagram” when you answer, though the caller won’t hear it. This lets you know a new lead has just appeared in MyMedLeads for that call.
Why and how you should enter new patients into MyMedLeads
- Click Add New Lead at the top left of the funnel.
- You’ll see a short form requiring only Lead Source, Name and either email or phone number. If you see the name appear at the bottom of the screen as you are typing, then the record already exists in MyMedLeads; select Use This. Otherwise Save to finish creating the record.
- If the lead is ready to schedule an appointment right away – in other words, to become a patent, just click Convert to (your EMR). From here you will schedule and manage them as you would any patient in your EMR.
- Note: some EMRs have 1-2 additional required fields you must provide, and for incoming calls you may need to update the person’s name or other info that didn’t come through on caller ID. Be sure to Save any changes before clicking Convert to.
How to Delete (disqualify) a lead
If your funnel is bloated with old leads that are not responding after multiple contact attempts, or will never become a patient for various reasons, it is time to Disqualify the lead, so they do not skew your Conversion numbers.
Disqualify a single lead:
- Open the lead
- Click the Delete button
- Choose Not Qualified. If you choose Duplicate or Test Lead then the lead is permanently gone.
- Choose a business reason that most closely matches the reason you are disqualifying the lead
- Click OK.
Disqualify old leads in bulk
- Go to View All Leads
- In the blue Filter bar set Status = Contacted
- Click the triangle next to the Lead Posted column heading to sort by oldest–> newest.
- If you like, narrow the date range even more using the Date field at the top of the screen.
- If you like, change the number of Show Entries (per page) to a larger number.
- Use the checkboxes in the right-most column to select any leads you want to disqualify. The top checkbox will Select All.
- Click the Delete button at the bottom of the list.
- Choose Not Qualified. If you choose Duplicate or Test Lead then the lead is permanently gone.
- Choose a business reason that most closely matches the reason you are disqualifying the leads It must be the same reason for all the leads you selected.
- Click OK.
Viewing a disqualified lead
- Click the number next to Not Qualified to see the list.
- You can export and analyze the list and look for patterns in business reasons and lead sources that can help you refine your strategy.
- Click the green check to re-enable any lead and restore it back to active.
We recently exported data out of a third party service. Is it possible to import this data directly into MyMedLeads?
Yes. After you export the data from your third party software/service and it is in a password encrypted Excel File, you would need to email that file to your Account Executive to import. Our importer does require that the data be formatted in a certain manner and is explained in the data importing option link listed below. Optionally, you may open up a Support Ticket to have this work completed.
Please Note: that you may optionally use the lead source “Email List”, this lead source will be hidden from your staff by default and not be included in reporting (as that can skew your numbers).
Learn more about our data importing options here
How do I unsubscribe a patient?
Open the lead and scroll down. You’ll see a Preferences field right above the row of buttons. You can unsubscribe someone from email and/or texts.
How to add/delete users
To Add a new user, please follow the steps below:
First, a current MyMedLeads user does this in MyMedLeads:
- Go to Preferences> Manage Staff/Location
- Click Add User button in the User section (not the Provider section)
- Fill out all required info.
Second, the new user goes to the client login page: https://crm.mymedleads.com/login.aspx
- Click the Reset Password link to have an email sent to you to set up a permanent password only you know.
- Log in to MyMedLeads for the first time with your permanent password. (User Name is your email address.)
To delete a user, please follow the steps below:
- From within the MyMedLeads application, go to Preferences > Manage Staff/Location
- Click “Delete” next to the user
- MyMedLeads will prompt you to reassign the user’s leads to a live user
- The lead itself will not be affected in any other way. All history will be preserved.
Tracking Results of Social Media Activity
- When you manually create or change any lead, you can select a social media account as Lead Source from the Lead Details page. This usually happens when someone calls the practice and says “I saw you on FB” or when you create a lead based on a conversation on FB.
- When someone browses from FB or IG page to a contact form on your practice website, MyMedLeads can sometimes detect codes (“UTMs”) in the link s/he used and capture that in a Referrer field. These leads will have Lead Source = (yourwebsite).com and Referrer ‘Facebook.’ Take a look at View Reports> Keyword and Referral Report to see the leads that came in w/Referrers.
- You can create a link from FB or IG to a special landing page that nobody would find just browsing around your practice website. Your web team needs to create the landing page and put a contact form on it. You can use the same form that you use elsewhere on your website; the important thing is the unique landing page.
- If you create your social media ads using the Zapier form application, we can integrate them directly to your MyMedLeads account so those leads have Lead Source FB or IG. Here is information about how to set that up.
- You can get a special phone number from MML and publish it only on your FB or IG account. These calls forward to your main practice number, and when the staff pick up the phone, the lead appears immediately in MML as a caller with Lead Source = Facebook or Instagram. MyMedLeads works with a carrier that provides tracking phone numbers; you have 10 free numbers on your account. Go to Preferences> Phone Number Management and follow these instructions.
Sending Text/SMS Messages and What to Expect
The MyMedLeads Platform has an automatic Consent Messaging System to make sure that all leads have consented to receiving Text/SMS Communications.
When Sending the First Text to a Lead
When you first send a Lead a Text/SMS message, the MyMedLeads Platform will check to see if a Consent was granted for this Lead’s Phone Number. Please Note: that the Platform looks at Phone1 and Phone2 individually, meaning that just because the Lead consented on Home Phone, the Lead will not receive texts automatically if the staff attempts to send a Text/SMS message to the same Lead’s Mobile Phone. Rather, another Consent Message will be sent to the Lead’s Mobile Phone.
If a Lead has consented for the Phone Number selected (Phone1 or Phone2), then the message will be delivered immediately, and the Text Conversation Tab will update to show the new Message. It is not necessary to refresh the page to see newly detected Text Messages from the Lead Details’ Conversation Tab. If the logic has not detected a Consent and is waiting for the Lead to reply with ‘Consent’ or ‘Decline’, the original message that was attempted to be sent, is deferred. Once the Lead replies with ‘Consent’, then the original message will be delivered immediately. If the Lead takes days/weeks to consent, then that message will stay deferred during that time and sent once consented.
If a Lead declines a Consent Request, then your staff will not be able to send Text/SMS messages to this Lead’s Phone Number, via the Text Conversation Tab. This Decline of Consent will not impact the Appointment Reminders/Confirmation Text Messages from going out. The Appointment Reminders/Confirmation system uses the Do Not Text Checkbox on the Lead Details page. At any time, if a Lead responds with the words: “Stop” or “Unsubscribe” the MyMedLeads Platform will mark the Lead as Do Not Text this Lead and will attempt to stop any outgoing texts to the Lead from our automated systems. Further, it will mark the Lead’s phone number as “Consent Declined” and your staff will no longer be able to text this lead.
Scope of Consent
Once a Lead consents to receiving Text Messages for Phone1 (or Phone2), then that Lead can receive Text Messages from any of your Text Enabled Call Tracking Phone Numbers to that Phone Number. It is not required for the lead to consent to Location A, Location B and Location C. Rather, once the Lead consents that your team can communicate with him/her via text, then you are free to use any of our Phone Numbers to communicate with that Lead and his/her consented phone number (Phone1 or Phone2).
How to be Informed of New Incoming Text Messages
By navigating to Preferences -> Manage Staff/Locations -> clicking Edit on your User Account – > then clicking on Set Preferences, this screen allows you to setup Email Notifications to you once a Lead responds to ANY Text Conversation, and/or you can setup Email Notifications to go to you.
Sending and Receiving Media such as images
The MyMedLeads Platform does not allow you to send the Lead(s) images via Text/SMS, nor receive any form of media from the Lead. This includes images and videos. You can send images and media ONLY via our Send Email functionality.
If the Lead Calls the Phone Number
The Call Tracking Number that you setup will still receive phone calls and will continue to forward those calls to your office (and possibly create leads (if the call tracking number advertised) and record incoming calls, if setup). You can configure the Call Tracking Phone Number to forward to your office line (or any phone number) from the Phone Number Management Screen on the Preferences Page (far right column).
How can I setup Dynamic Call Tracking?
Introduction
The MyMedLeads Platform comes with the ability to track web visitors who simply call your office, rather than filling out the form. You are able to easily create a Phone Number within MyMedLeads track all your website traffic, via a single number. You are also able to be track visitors by how the visitor found your website, such as SearchEngine, PPC and directory sites (EX: RealSelf.com, etc). The below document will assist you with setting this up and what is required. The instructions here are high level, however your team will be provided specific instructions when it is time to implement your system (normally when we integrate your website).
Intended Audience
The intended audience of this document is intended on a technical resource, such as your web master/developer.
Required Assets
To setup Dynamic Call Tracking you will need to be able to update the Html of your website. In most cases, this is simply adding a reference to a javascript file.
It is suggested that a list be prepared of known referrers that send traffic to your website, Google, Bing, Google Adwords are a few that are commonly tracked.
Your MyMedLeads Account defaults with 10 Call Tracking Phone Numbers. It is required that for each referrer you have a Phone Number to represent that referrer. If your account does not have enough phone numbers, it is possible to increase the pool by contacting your Account Executive *charges may apply.
Implementing Dynamic Call Tracking
The below document outlines the steps neceessary to setup Dynamic Call Tracking on your website(s).
Steps
- Create a List of Referrers you would like to track
Your MyMedLeads account defaults with 10 phone numbers. For each referrer that you would like to track, it will require a Phone Number from that pool of 10. If additional Phone Numbers are required, you may contact your Account Executive to increase this pool. Once you have the list created and you know what to track, you will need to create the Phone Numbers; discussed in the next step.
2. Within your MyMedLeads Account, navigate to the Preferences -> Phone Number Management page.
In this page you will need to create phone numbers that will be rendered when a Lead is detected from PPC (as an example). When building the Phone Numbers, simply select the features you would like (recording, call whispers, etc). The LeadSource of the new Phone Number can be the same LeadSource that represents your website, what is important is selecting the correct Referrer. If the Referrer is not within the list, please contact your Account Executive and he/she can include it.
3. Update the HTML of Your Website
Your web team will need to update the website’s HTML. The updates are minimal, but necessary. Within the content of the website (including headers and footers), we will need the team to place a <span> tag around all phone numbers. With the exception of phone numbers that are already wrapped within an <a> tag. Both, the phone numbers with <span> tags and the phone numbers with <a> tags will need a CSS class applied to them. See the below table to see the default CSS Classes that we look for. The website’s HTML will need to be updated to include a javascript file reference. The URL of this file will be advertised by the Support Team in Step 4.
<span class=”mmlphone”>
<a class=”mmlphonelink”>
4. Contact MyMedLeads Support or open a support ticket to request that your site include Dynamic Call Tracking.
When you contact the Support Team, we will produce a URL for your team to reference within the Website.
I am not able to manually text our leads, what is wrong?
If you attempt to send a Text Message and the Account is not properly configured to send out texts, you may need to refer to our Two Way Texting Help Manual (link is below). It is required that you have, at minimum, one call tracking phone number and that it is properly associated with a Location. You can see how to do this by using the link below.
How can I keep track of unresponsive leads?
- First, when you open a lead, there is a Reminder button you can use to remind yourself at whatever time intervals you like to follow up w/someone. Many of our clients will set a reminder for a week out and just cancel it if the person calls back before that time. These reminders notify you via email and they also appear on the dashboard (Home page) for anyone to see.
- Second, when you look at View All Leads, there’s a column heading that looks like a phone and email icon where you can see how many times your staff has reached out to the lead by either method. You can sort and filter View All Leads and then follow up as your workflow requires. For instance I could filter Status = Contacted and date range Last Month and then follow up w/anyone who had been contacted less than X times.
- Finally, Campaign Builder allows you to add an “Outbound Call” element to drip campaigns that alerts your staff if someone has not responded to any of the messages from the campaign. Go to Preferences> Campaign Builder and click an existing campaign to see an example. Click Next two times and you’ll see the page where you can pull in Email, Text or Outbound call elements.
How do I add new user within our MyMedLeads account?
Adding new users to the account is very easy to do. You would need to navigate to the Preferences -> Add/Edit Users screen.
We have a help document on User Management Here.
What happens to leads assigned to a deleted user?
Best Practices with MyMedLeads
Workflow Optimization
The effectiveness of MyMedLeads, like any new business software, hinges on your staff’s ability to utilize it to the fullest. Establishing and maintaining efficient workflow strategies is crucial to maximizing the software’s effectiveness and boosting patient conversion rates. These optimal workflow processes are broken down into daily, weekly, and monthly tasks that should be consistently performed to optimize the software’s overall effectiveness.
Daily Tasks
Start your day by logging into MyMedLeads to review any new leads. These leads come from inquiries made through your website or other online listings for your practice. MyMedLeads also provides call-tracking phone numbers that can generate additional leads, which will appear in the system.
Once leads are properly managed, the “New Leads” section of the sales funnel will reset to zero. Think of this “New Leads” layer as your inbox – new inquiries should not sit here for long. Your goal should be to move these leads down the funnel as quickly as possible.

Twice per Week Tasks
Persistent follow-up with leads is a key factor in booking more appointments, even after the initial response time. Practices that follow up with leads at least 3 times have a 45% higher conversion rate than those that only call leads once. MyMedLeads streamlines this process by generating automatic follow-up lists, making it easy to stay on top of prospects. This allows you to quickly identify leads who haven’t been contacted in over a week and reach out to them again.
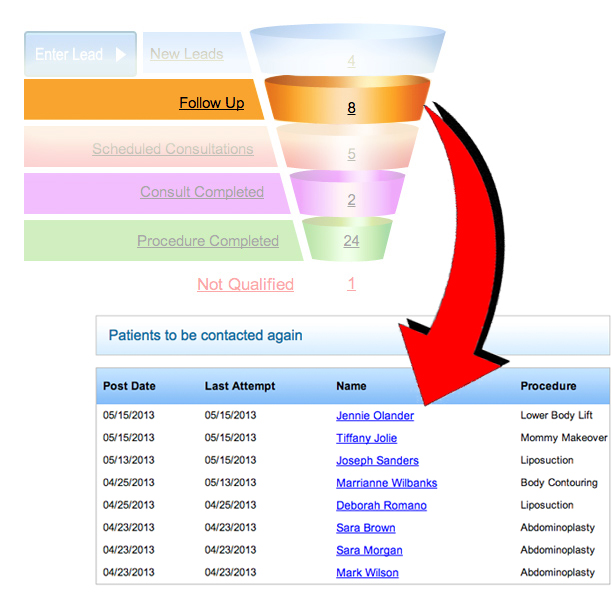
Managing Leads
MyMedLeads allows you to create targeted email campaigns for specific procedures. These campaigns can be automatically sent to leads as soon as they enter the system. Leads can arrive in the system through one of three different methods.
1.) Via Form Submission – Leads can come through your website’s contact form or from any other site where you advertise, such as directory listings. In most cases, you’ll have the lead’s email address, and depending on your form setup, you may also know their procedure of interest. MyMedLeads automatically identifies this information and sends a series of targeted emails tailored to the individual’s interests over time.

2.) By Manual Entry – Entering new leads into the system is straightforward. Simply click the “Enter Lead” button to the left of the funnel, which will take you to a page with two options: “Manage Lead” if you’re speaking with the individual, or “Enter Lead Only” for when you’re reviewing voicemails in the morning.
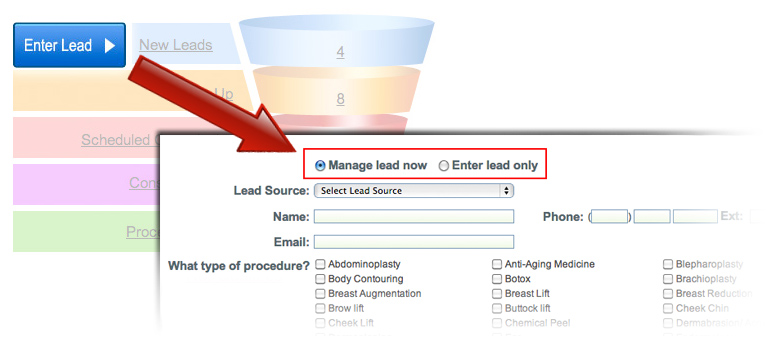
3.) Via Phone Call – MyMedLeads offers call tracking phone numbers that automatically log incoming calls as leads in the system. When capturing leads over the phone, be sure to collect the caller’s email address and the procedure they are interested in, so you can market to them effectively. If a lead requests no email communications, you can note this preference in the Lead Preferences section.
![]()
Weekly Tasks
Scheduling weekly meetings with staff to review response times and follow-up practices can effectively prevent neglecting outreach to potential patients amid daily responsibilities. These meetings provide an excellent forum to discuss best practices for lead follow-up and collaborate on strategies to convert more patients.
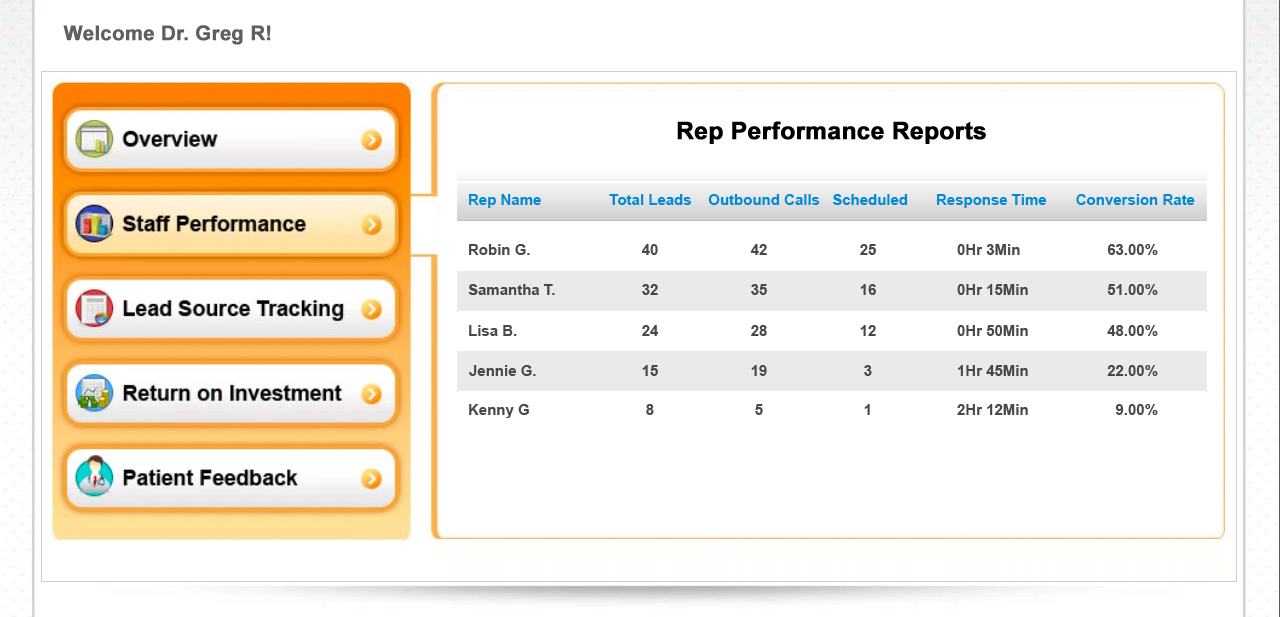
Monthly Tasks
Review your marketing ROI reports monthly to evaluate the effectiveness of your current marketing channels. Accurately track revenue in MyMedLeads for completed procedures so it can precisely calculate the ROI on each marketing investment. This clear, actionable ROI data will streamline your monthly marketing budget reviews, allowing you to easily identify which strategies are working and which are not. Regularly assessing this data will help ensure your practice runs efficiently and avoids wasting advertising funds on ineffective campaigns.
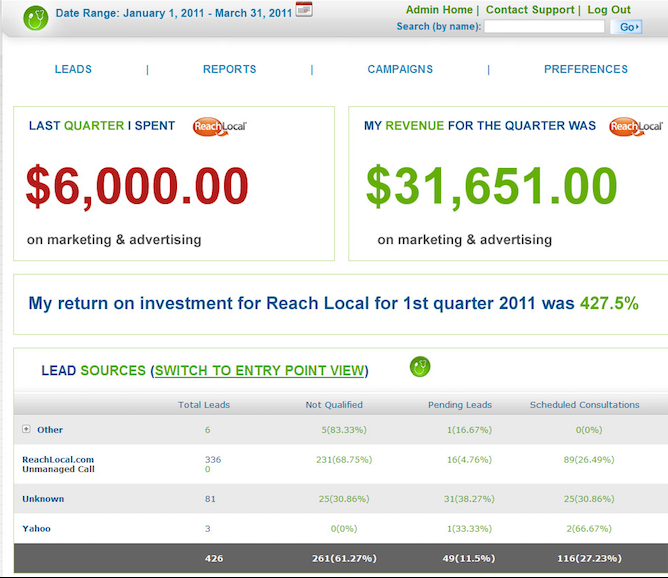
Can I search for a lead by phone number?
A link to a recorded lead call is not playing
What if a lead comes in more than once on different lead sources (Last Attribution)
View All Leads as a “report”
If none of the reports in the View Reports drop-down menu show the data you need, try the View All Leads page.
- (optional) set a date range for the Lead Post (Creation) date at top right of screen.
- (optional) sort a column by clicking the little triangle next to the column name
- In blue filter bar, set one or more filters to a desired value
- Scroll down and click the Export button on bottom right. Your list will open in your spreadsheet program (i.e. Excel)
If you need to filter a particular field by more than one criterion (ex: Status = Consult Complete and Procedure Complete), then don’t apply a filter to that field at all. You can use the more complex filters and analytical tools in Excel.
The export version of the report has all of the columns you see on View All Leads screen, plus others:
- Lead ID
- Post (Created) Date
- Last Post Date
- Lead Name
- User Name
- Address
- City
- State
- Zip
- Phone
- Mobile Number
- Lead Source
- Referral Name
- Keyword
- Referred By
- Provider
- Procedure
- Status
- Schedule Date
- Scheduled By
- Date of Birth
PLEASE NOTE: When exporting leads from MyMedLeads for use in another marketing platform, be sure to exclude any leads that have unsubscribed from email or text messages. You can filter out the unsubscribed contacts on the exported Excel sheet before uploading the data to your new system.
Why is a lead marked as Scheduled, but has already completed an appointment?
This is a concern and is probably due to how your account is configured to read messages from your scheduling software. If your scheduling software is sending in appointment statuses that are not being interpreted as Completed within MyMedLeads, the MML team may need to configure your account. This is applicable, specifically when a Lead is marked Consult Completed when he/she should be in the Procedure Completed layer of the funnel.
If this occurs, please report this to your Account Executive by opening up a support ticket and providing the URL to that lead’s details page.
Calling internet leads
When it comes to calling Internet leads, speed is crucial. The longer the time gap between when a lead arrives and when that lead is called, the lower the likelihood of that lead being converted into a patient. Studies have shown that leads called within the first 10 minutes of arrival are 70 times more likely to convert than those contacted an hour after being received. After 1 hour, conversion rates begin to drop significantly. According to data, the average medical practice takes around 9 hours to respond to form inquiries, resulting in a dismal patient conversion rate around 8%. On the other hand, practices that respond to online inquiries within the first hour convert about 65% of these leads into patients.

Medical practices cannot afford to ignore these stats. MyMedLeads software includes powerful call tracking technology that records inbound and outbound phone calls. Our system can track the number of times each lead is called and puts a stopwatch to each lead that arrives to ensure they are called promptly.
![]()
How many PPC Leads have I had in the last X Months?
You can find this report by using the primary navigation of the MyMedLeads account, it is located under Reports -> Keyword and Referral Report. Using the Date Filter at the top right corner of the page, you can control the scope of your search.

Our keyword reporting feature allows you to dig even deeper into lead data by associating keywords from organic and PPC searches to your incoming web inquiries. This report also tracks the referral sites that initially sent leads to your website (i.e. Google, Bing, RealSelf, etc…) This intelligent data shows you which keywords are sending the highest converting patients and generating the most revenue for your practice. This valuable information can then be used to revamp and adjust your online marketing campaigns and SEO strategy accordingly.
Additionally, knowing what search term a prospective patient used to find your practice can provide your staff with valuable context about their needs. Having a better understanding of a lead’s interests before contacting them can often improve call outcomes.
How do I enter a lead into my account manually?
To manually enter a lead from the admin homepage, click on the Enter Lead button on the top left. When the Enter Leads page opens up, you will see two options: Manage Lead Now or Enter Lead Only.
- Enter Lead Only: Will let you enter patient information, but when you save, it will send out an email notification to your users, so that someone may follow up with the patient. For instance, if you are checking voice mail in the morning and want to simply enter leads so that others can manage them, choose this option.
- Manage Lead Now: Will send you directly to the lead management page once you have entered patient information. This is ideal when you have the patient on the phone.
For marketing tracking purposes, it is important to ask each caller how they heard about your practice. The lead source field will have a list of all the lead sources you have created, for you to quickly choose from. Then, enter the name, email and phone number of the user. Finally, select the procedures that they are interested in and add comments from your conversation with the patient. When you are finished, click Save and Proceed, and you will be taken to the lead management page where you can send an email, set a reminder to call the patient later, or, if the patient is ready to schedule, you can schedule them for a consultation.
When communicating via Text/SMS can images be included within those conversations?
You and your staff cannot communicate images to leads, via our Text/SMS features. The leads can respond with images, those images will be emailed to your email address that is on file with MyMedLeads. Please make sure that you have preferences turned on to receive notifications of incoming texts. This is specific to our Two Way Texting feature, as the appointment confirmations normally would not receive an image.
To turn this on, you will need to navigate to: Preferences -> Manage Staff/Location screen. On this page you will need to click on “Edit” next to your User Name.
On this screen there is an “Set Preferences” button on bottom right of the screen, click that. On this page you can set the preference for receiving email notifications of all incoming text. The checkbox to select is labeled: “Notify me of all incoming texts”.
You can learn more about our Two Way Texting Feature Here.