Campaign Builder User Guide

1.MyMedLeads Guide to Email Marketing & Building Successful Campaigns
As your practice grows, it becomes increasingly difficult to give one-on-one attention to each lead and patient. Using MyMedLeads’ Communication Center, your practice can easily create workflows to send personalized and relevant messages to the right individuals at the right time.
Our new drag-and-drop automation builder makes it easy to visually assemble a sequence of communications that can include a combination of emails, text messages, and outbound phone calls.
While newsletters and one-off emails will always have their place in your marketing strategy, the most successful practices are using automated campaigns that deploy based on scheduled or action-triggered events.
These automated campaigns are set up once, and automatically send to a particular individual when that person meets a certain trigger. The beauty of campaign automation is that it enables you to create hyper-targeted content that is more likely to be opened and drive engagement with your prospects and patients. You only have to set up the campaign once, and then, as more people continue to meet the trigger you defined, the campaign will continue to be sent to them without you ever having to lift a finger.
Since these campaigns work on a basic trigger and action system, you are really only limited in what you can do by your creativity and the specific needs of your practice.
Below, we’ll explore the most common types of automated campaigns you can use to grow your practice and increase patient retention.
2.Procedure Marketing
The What…
According to research, 50% of leads generated by organizations are qualified but not yet ready to purchase.
This is very often the case in the medical industry as well. So, how do you help move those leads along to your sales pipeline without spending too much time on them? And how do you make sure your practice is top of mind when they are ready to schedule?
Using campaign automation to set up a series of lead nurturing emails is a great way to do this. With the Communication Center, it is easy to set up personalized email campaigns for as many services and procedures as you like. Procedure-specific marketing campaigns typically consist of 3 – 5 emails that are scheduled to go out over the course of the first month.
Each email is designed to provide the lead with more relevant information on their procedure of interest while generating further curiosity in what you have to offer them. These emails should include specific and valuable information that the lead is looking for.
Procedure-specific marketing campaigns also allow you to establish yourself as a knowledgeable resource in your field while engendering a sense of trust that translates offline when the lead is ready to schedule.
The How…
This Campaign Type evaluates Procedures by looking first to the Lead’s interests to see if the Lead is qualified for the Campaign, by checking to see if Procedure X is selected within his/her interests.
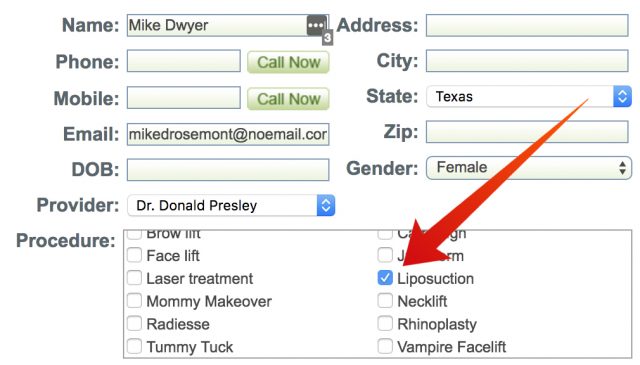
Our system then evaluates the Appointments of a qualified Lead to see if any Appointments were scheduled for Procedure X (or optionally, if the Lead was scheduled for ANY Appointment). By default, the individual Campaigns will target Leads who are interested in Procedure X, but who have not scheduled for a Consultation for Procedure X. BUT, you can set the system to disqualify the Lead once he/she is scheduled for ANY scheduled appointment.
Possible Target Filters include:
- Age – you may select an age range, if the lead does not have a DOB then he/she will be included
- Gender– you may select gender, if the lead does not have a Gender selected, then he/she will be included
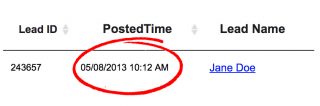
- Lead Posted – the date the Lead was introduced to MyMedLeads
- Procedures – this targets the Lead’s Interest
- Lead Source – if the Lead ever came through one of the selected Lead Sources
This Campaign Type supports all communication types (Email, Text and Outbound Call Reminders). Your staff can schedule a communication to go out based upon the Lead Posted time stamp for the individual Leads. This time stamp (Lead Posted), is the time stamp of when the Lead was first created within MyMedLeads. Please note that there is a 24-hour window of time, it is possible that the entire Campaign could be expired for existing Leads.
 The Default Campaign
Your account comes with a Default Procedure Campaign (which you will need to create messages for). If a single Lead is not qualified for any other Procedure Marketing Campaigns you have created, then he/she will be evaluated for the Default Campaign. The Lead is removed from the Default Campaign once the Lead is scheduled for Any Appointment.
Additionally, IF a lead is qualified for two or more procedure-marketing campaigns, for instance – Breast Lift and Liposuction. Rather than receiving both campaigns, they will receive ONLY the Default campaign instead.
If the Lead is within (or qualifies for) any Procedure Marketing Campaign, then he/she will not be qualified for the Default Campaign. If the Lead is qualified for the Default Campaign and another Procedure Marketing Campaign, that is essentially expired for the individual Lead, will prevent the Lead from being placed within the Default Campaign.
Example: Your Botox Marketing Campaign has communications for 2 weeks, the Default Marketing Campaign has communications for 6 weeks. You activate both Campaigns and the existing (Botox) Lead, that was posted 4 weeks ago, will not be placed in the Botox Campaign (because it is expired) and will not be placed within the Default Campaign either, because he/she is technically qualified for the Botox Campaign.
Creating Your Default Campaign
Your Default campaign should be general enough to appeal to a broad range of potential patients in terms of age and gender. For your Default Campaign, you should focus on more general topics like the Doctor’s experience and credentials, the range of procedures you offer, financing options, etc…
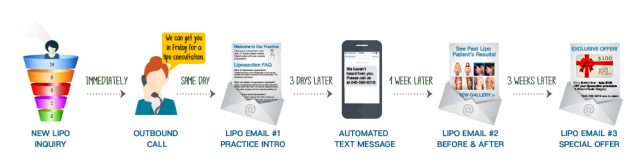
A typical Procedure Marketing Campaign for Botox may look like this:
(24 hours after the lead contacts your practice)
Email #1 – Not immediately sending the first email gives your staff appropriate time to contact the lead first. In the initial email, you can thank the individual for their interest in your practice and explain the issues (pain points) that Botox addresses. Provide a clear and prominent call-to-action for the individual to take, typically calling your office back to schedule a consultation.
(2 days after previous automated email)
Email #2 – In this follow up email, you can provide a link to your online Botox photo gallery showcasing the results of your previous Botox patients. Building trust and confidence with every patient is a vital first step, and as the old saying goes, “A picture is worth a thousand words.”
(4 days after previous automated email)
Email #3 – Building on the concept of trust, it is important to highlight the experience of your Physician or Nurse Injector. So, for instance, if your practice has been recognized as a Black Diamond Botox Provider, this is certainly relevant and worth mentioning. You may also include links to any media appearances or videos of your doctor discussing or performing a Botox treatment.
(1 week after previous automated email)
Email #4 – When it comes to aesthetic procedures like Botox, it is important to (in sales-speak), overcome the prospect’s “objections” in order to “close the deal”. Consider the most common concerns that your Botox patients express, for instance, the fear of needles and pain, or potential bruising afterward. You can send the lead additional resources you have on Botox that can assuage these fears, or include a Botox FAQ directly in the email.
(2 weeks after previous automated email)
Email #5 – If the lead has been unresponsive up to this point, extending an exclusive, time-sensitive offer on Botox in the last email of the series can be a great way to give them one final push to get them into your office. This is often worth it, especially on recurring treatments where you are potentially gaining a long-term patient.
This is merely one example of what a procedure marketing campaign might look like. You may also wish to include text messages and outbound call reminders as a part of your lead nurturing campaigns. For instance, after the 5th email that includes a special, time-sensitive offer, you could schedule a reminder to call the lead 2 days later to remind them about the promotion.
3.Post-Consult Campaigns
The What…
Following up with a potential patient after their consultation is important, but let’s face it: Staff gets busy, and these potential patients can easily get forgotten about. Although we recommend that the first contact post-consult is a staff member picking up the phone to check in with the soon-to-be patient, putting automated workflows in place helps to ensure that no prospect slips through the cracks.
You could create one general post-consult follow-up series for all patients. Or, you may choose to create one for surgical and one for non-surgical procedures. Even better, much like the procedure marketing campaigns mentioned above, you could create more targeted post-consult campaigns by procedure. The more relevant the message is to the individual, the more likely they are to engage.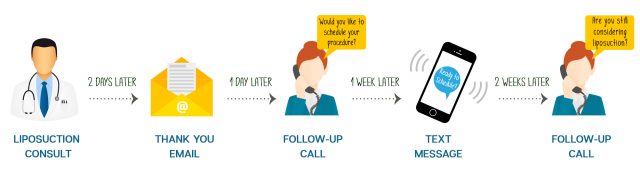
The How…
This Campaign Type targets Leads who have completed a consultation for Procedure X, but have not scheduled for a Surgery/MinorProcedure of Procedure X. Once scheduled for Procedure X, then the Lead is removed from this Campaign.
The Consultation for Procedure X, must be marked Completed before this Campaign will trigger. A Lead cannot be placed into a single Campaign twice. So, if the Campaign finds that the Lead is qualified (again) for the Campaign, he/she will not be placed within the Campaign (this helps prevent duplicate communications).

By default, the individual Campaigns will target Appointments with the Appointment Type of Consultation for Procedure X, but who have not scheduled for a Surgery/MinorProcedure for Procedure X. Optionally, you can set the system to disqualify the Lead once he/she is scheduled for ANY Surgery/MinorProcedure.
Procedure Targeting
When evaluating to see if a Lead is qualified for a Post-Consult Campaign, the Lead’s Appointments are evaluated. The Appointments are evaluated by Type and Procedure; if the Appointment is for Procedure X and it is a Consultation, then the Lead is qualified for this Campaign. The Lead’s Appointments are also evaluated to disqualify the Lead (already scheduled for the surgery/minorprocedure of Procedure X.)
Possible Target Filters include:
- Age – you may select an age range, if the lead does not have a DOB then he/she will be included
- Gender– you may select gender, if the lead does not have a Gender selected, then he/she will be included
- Lead Posted – the date the Lead was introduced to MyMedLeads
- Procedures – this targets each Appointment with a Type of Consultation and contains Proce dure X
- Lead Source – if the Lead ever came through one of the selected Lead Sources
- Reviews/Feedback – if the Lead left a Feedback with above/below X Stars
- Revenue – if the Lead has spent above/below X dollars
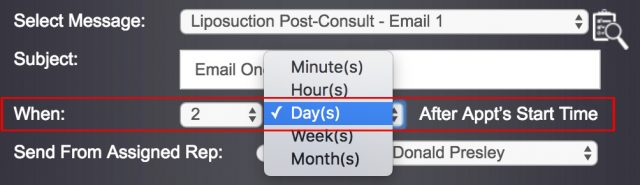
This Campaign Type supports all communication types (Email, Text and Outbound Call Reminder). Your staff can schedule a communication to go out after the Consultation has been marked completed. The communications will be scheduled, based upon the start time of the Consultation for Procedure X, and you can set each communication to go out X Minutes/Hours/Days/Weeks after the Start Time of the Consultation for Procedure X.
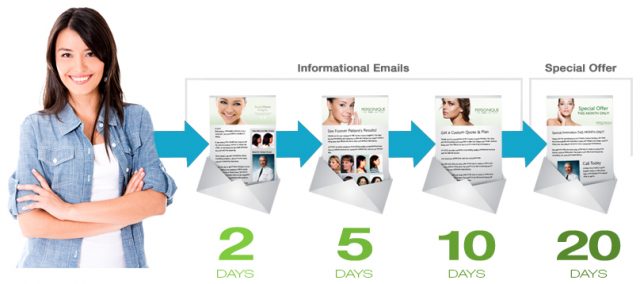
A typical Post-Consult campaign for Breast Augmentation may look like this:
(2 days after consultation)
Outbound Call #1 – “Hi Courtney, it’s Lindsey from Dr. Wilson’s office. It was so great to meet you the other day. I know you’re thinking it over and plan on going to a couple more consults to do your due-diligence, but I had an idea that may help. I thought of a great checklist Dr. Wilson wrote about Breast Augmentation that would help you get the most from the consultations you’re going on. I just emailed it over to you so please take a look and let me know if it’s helpful to you. If you have any additional questions, please do not hesitate to ask!”
(2 days after consultation)
Email #1 – Send over the “Checklist of Questions to Ask the Surgeon During Your Breast Augmentation Consultation” that you have already created. Fill the checklist with questions you can say yes to that your competitors may not be able to; i.e., you have performed an above-average number of Breast Augmentations, have dozens of before & after photos of your breast augmentation patients (provide link), you have a number of public testimonials from your breast augmentation patients and can provide their contact info (or at least an invitation to set your happy patients up to talk to the prospective patient about their experience), etc…
(4 days after previous automated email)
Email #2 – Often times, patients may put off committing to surgery because it’s a lot of money. Send over an informative email reminding them of the different payment options your practice offers to help make elective cosmetic procedures more affordable. Make sure the information is presented in a clear and understandable way. Encourage them to call your office if they have any questions about financing or need help filling out an application. It would also be a good idea to create a helpful resource that outlines the process and provides loan application tips to improve their chances of being approved.
(1 week after previous automated email)
Email #3 – When it comes to a surgical procedure like Breast Augmentation, it is important to (in sales-speak), overcome the prospect’s “objections” in order to “close the deal”. Consider the most common concerns that your Breast Augmentation patients express, for instance, the length of recovery time, fear of scars, fear of anesthesia, lack of family support, afraid of being judged, worried about the result, and so on. Create a comprehensive resource that addresses these specific worries and A.) Why they should not be a concern, or B.) How they can overcome these barriers.
(3 weeks after previous automated email)
Email #4 – If the prospect has been unresponsive up to this point, extending an exclusive, time-sensitive offer such as 10% OFF the surgeon’s fee for Breast Augmentation could provide just the right incentive to choose your practice if they are still in the research and decision-making stage.
(1 week after previous automated email)
Text Message #1 – Send a short text message reminding the prospect of the special offer on Breast Augmentation and provide your office phone number for them to call immediately to schedule their appointment.
(2 days after text message)
Outbound Call #2 – “Hi Courtney, it’s Lindsey from Dr. Wilson’s office. I just wanted to touch base with you to see if you were interested in taking advantage of our current special offer on Breast Augmentation for 10% Off surgeon’s fees. That’s $370 in savings! We cannot offer this special for long, so if you would like to go ahead and schedule, please let me know as soon as possible and we’ll work out a time that’s best for you.”
4.Recall Campaigns
The What…
According to research, keeping existing patients coming back is almost 10 times less expensive than attracting new ones. Thus, an effective patient recall system is one of the most important components to the overall success of your practice. Not only does it help you to avoid lost revenue for your practice, it can also boost patient satisfaction.
However, traditional recall methods are labor intensive and expensive. The reality is that many practices lack the staff or resources to manually call patients to remind them when it’s time to schedule an appointment, and as postage rates continue to rise, postcard reminders become a less viable option.
Automated recall from MyMedLeads helps you begin increasing revenue and filling your schedule without adding to your staffs’ already busy workload. Recall messages using automated calls, text and email allow your practice convenient channels of communication for reaching out to patients to schedule future appointments.
The How…
Recall campaigns are especially great for recurring treatments like Botox and fillers. MyMedLeads integrates with your practice management software to automatically monitor recurring treatment dates for patients. You can set up treatment-specific campaigns that will automatically contact patients when it’s time to schedule repeat treatments or exams.
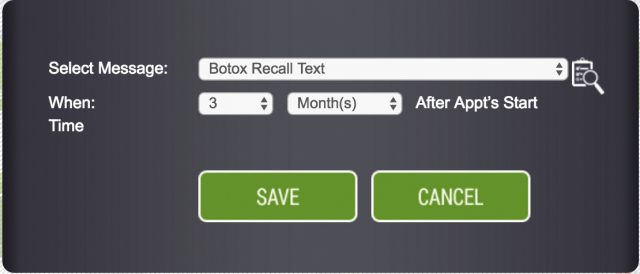
A typical Recall campaign for Botox may look like this:
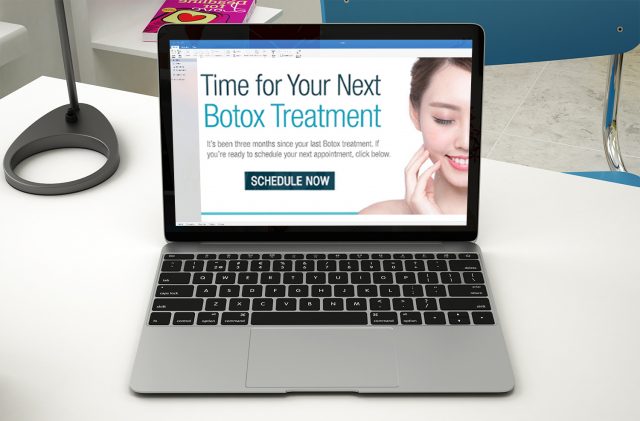
(3 months after treatment date)
Email #1 – “Hi Courtney, it looks like it’s time to schedule your next Botox treatment. We currently have some appointment times available. If you would like to request an appointment, please click on the button below, or simply give our office a call at (555) 399-8319 to schedule your next visit. We look forward to seeing you!”
(2 weeks after previously automated email)
Text Message #1 – “Hi Courtney, it’s been over 3 months since your last Botox treatment. If you would like to schedule an appointment, please call our office at (555) 399-8319.
(1 week after previous automated text)
Outbound Call #1 – “Hi Courtney, it’s Lindsey from Dr. Wilson’s office. I just wanted to check in with you to see how the results of your latest Botox treatment are going. As you know, repeat injections are required to maintain the benefits of Botox, and it looks like it’s been about 4 months since your last treatment. We typically recommend scheduling Botox injections every 3 – 4 months to maintain results. Would you like to go ahead and schedule your next appointment today? We have some appointment times available this week.”
5.Newsletter/Blasts/Specials Marketing
This Campaign Type is similar to the Procedure Marketing, in that it looks for the Lead’s interests to qualify the Lead into the Campaign. If the Campaign detects that Procedure X is selected within the Lead’s Interests, then the Lead is qualified for this Campaign.
This Campaign does not have an End Criteria, if the Lead is interested in Procedure X and meets all other requirements then the Lead is qualified for the Campaign.
6.Campaign Types and Audience Targeting
Once you have created the messages you need, you’re ready to build your first campaign. The Campaign Builder allows you to create complex campaigns that target specific groups within your lead pool. For instance:
- Procedure Marketing – market to leads with an interest in Procedure X, but has Not Scheduled for a consultation.
- Post Consultation Marketing – market to leads who have completed a Consultation, but have Not Scheduled for the Procedure/Surgery.
- Blast / Newsletters / Specials – similar to Procedure Marketing when targeting qualified leads.
Targeting Specific Procedures
When targeting Leads for Campaigns, it is important to be aware of how our Campaign System integrates into a general Sales Process.
- Before the Lead is scheduled (procedure marketing)
- After the Lead completes a consultation (post-consultation)
- Once the Lead has committed (pre-op)
- After the lead has completed (post-op)
The MyMedLeads Communication Center has Campaign Types that can be triggered once a Lead has moved to the next step within the Sales Process. These Campaign Types define the Start and Stop Criteria of a Campaign. They also inform us WHERE the MyMedLeads platform will look for the Procedure.
Most marketing is going to be based upon Procedure X, but WHEN and WHERE the system looks for Procedure X is based upon the Campaign Type.
MyMedLeads will look to either Appointments with the correct Appointment Types, or it could look to the Lead’s Procedure List (in the case of Procedure Marketing and Blasts).
Possible Communication Types
When creating your Campaigns, you can send Text messages, Emails or a Reminder to set an Outbound Call. You can control when the messages go out in our drag-and-drop flowchart Campaign screen.
Individual Communication Processing and Expiration
When the Campaign is evaluating if a Lead or Appointment should receive a single Communication from an already Live Campaign, the Campaign looks to the time stamp that the communication should be sent, compares it to right now. If the communication time stamp is over 24 hours old, then the communication is considered expired and the next communication on the Flow Chart Screen will be evaluated, until a communication is found that is not expired.
7.Account Setup and Configuration
Global On / Off
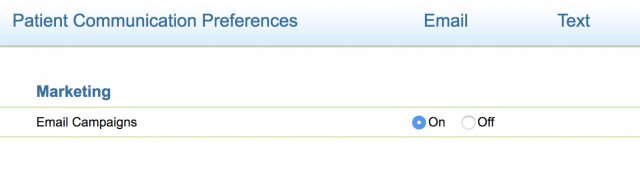
Navigating to the Preferences page and clicking on the Patient Communications link will take you to your Patient Communications Preference page. At the top, you will see an Email Campaigns opition. This is a global On and Off switch for ALL Campaigns. While this is ON your Communications will be sent, while OFF the communications will be blocked.
Location Mapping
Within your account, please create a Location per Location within your Scheduling Software. If you have an integrated Account, our team may need to perform a mapping of your Locations.
Appointment Type Mapping
Within your Scheduling Software you may have twenty or more Appointment Types. Within MyMedLeads there are only eight Appointment Types.
Procedure Mapping
Mapping your Procedures is a rather easy process. Please make sure that the Procedure list within your account matches the procedures offered by your Practice. At minimum, put in the Procedures that you are interested in.
8.Building your First Marketing Campaign
The MyMedLeads Marketing Campaign is an easy to use, very intuitive, drag-and-drop, interface that allows non-programmers and non-technical users to build rather complicated Marketing Campaigns with zero to no programming knowledge. Our drag-and-drop interface allows designers to quickly build the communications and the flow of your Campaigns without the need for complicated scripts or programming.
The Campaign Builder works exactly the same for all Campaign Types. The fields that are captured may look at different properties of a Lead or different properties of an Appointment, based upon the currently selected Campaign Type.
The Campaign Builder does not really change when updating or creating a Procedure Marketing or Post Consultation Marketing Campaign. The Procedure Field within the Select Audience tab may look to the Lead’s Procedure of Interest, or it may look to an Appointment’s Procedure to determine if the Lead/Appointment is qualified. This selection is based upon the Campaign Type.
Campaign Wizard
The MyMedLeads Marketing Campaign is broken up into a 4-step wizard. You access this buy navigating to: Preferences -> Campaign Builder.
Campaign Details Tab
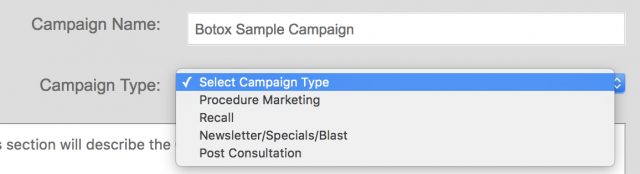
The first screen you will see is the Campaign Details tab, where you will give your campaign a name. This name will not be seen by recipients and is for internal identification purposes. Make sure the name is descriptive enough for other staff members to quickly understand what the campaign is, and who it is meant for. For instance: Botox Procedure Marketing – #1 or Lipo Post-Consult –#2.
Next, select the Campaign Type from the dropdown menu. You may also wish to write a quick sentence or two in the available text box describing the campaign.
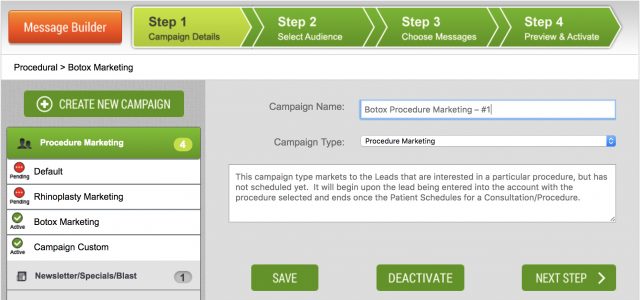
From the Campaign Details page, you can also select an existing campaign from the side menu to update. It is however not recommended to update Live Campaigns unnecessarily. This can and will cause some Leads to be removed or added to certain communications, based upon the target dates and what communications the Lead has already received from this particular Campaign. For this reason, it is important to have the campaign as correct and finalized as possible before you publish it.
Select Audience Tab
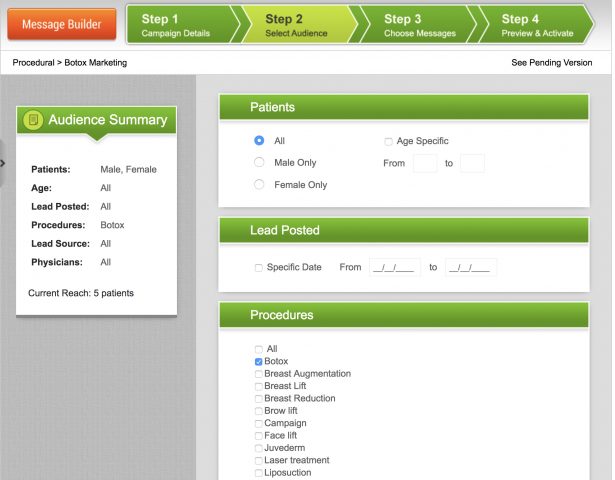
Once you have named your campaign, click Next Step to proceed to the Select Audience tab. This page allows you to select the Procedure you wish to target, as well as any other criteria a Lead must meet to be placed within the Campaign.
The Select Audience tab looks the same for most all campaign types. However, if you are creating an Appointment-centric Campaign such as a Post-Consultation campaign, there are some Appointment-specific properties that you can filter by, such as the office location.
Choose Message Tab
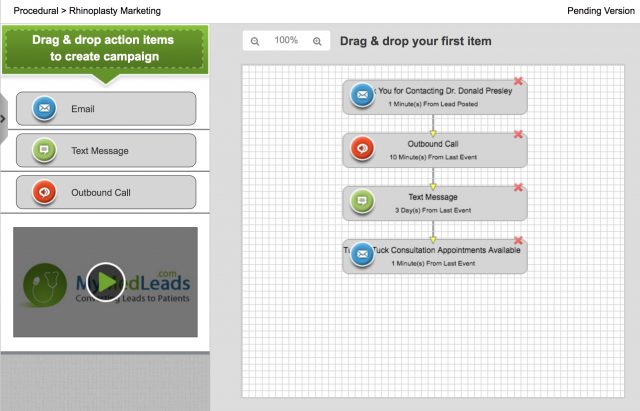
On this tab you can define what messages are sent out and when they are sent out. The flow chart design makes visualizing your marketing process extremely simple and straightforward. The drag-and-drop canvas allows practices to build a sequence of automated communications that are triggered as leads and patients progress from tile to tile.
When you drag-and-drop a communication onto the canvas, a form will appear for you to select the exact Message to send, when to send it, and possibly who to send it from (based upon the Communication Type).
You can chain as many messages as you like. There is no way to repeat the same message after some interval, you must manually drag-and-drop each message you want sent.

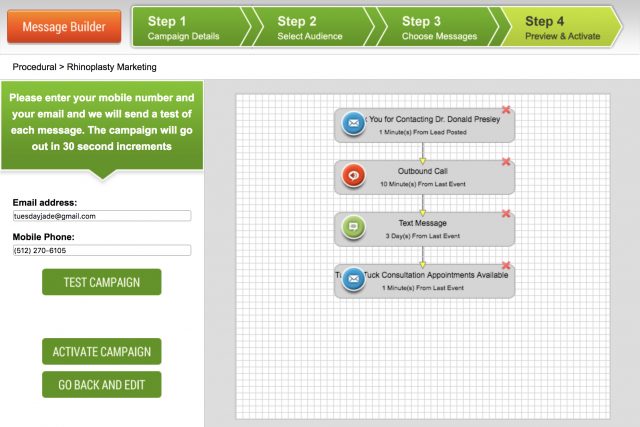
Preview & Activate Tab
The final tab is where you can test your Campaign (in its entirety) and activate the Campaign. Activate and Publish are synonymous within MyMedLeads.
When testing the Campaign, it can take up to 5 minutes for the first message to be sent out and possibly a few minutes between each message. This is because your test is not only testing the messages, but also going through most/all of the Campaign’s Logic and is scheduled just as if it were a real live Lead. The evaluation is minimally done (for obvious reasons) and the timestamp to send out the communication is also updated so that you do not have to wait weeks for that last message. This is a true test of not only your individual messages, but also the campaign sequence itself.
When you are ready to activate your Campaign, please note that it can take up to 8 hours for the system to begin evaluating your existing leads for this Campaign. Newly introduced Leads/Appointments will be evaluated normally, and can be placed within the Campaign within minutes of posting to MyMedLeads.
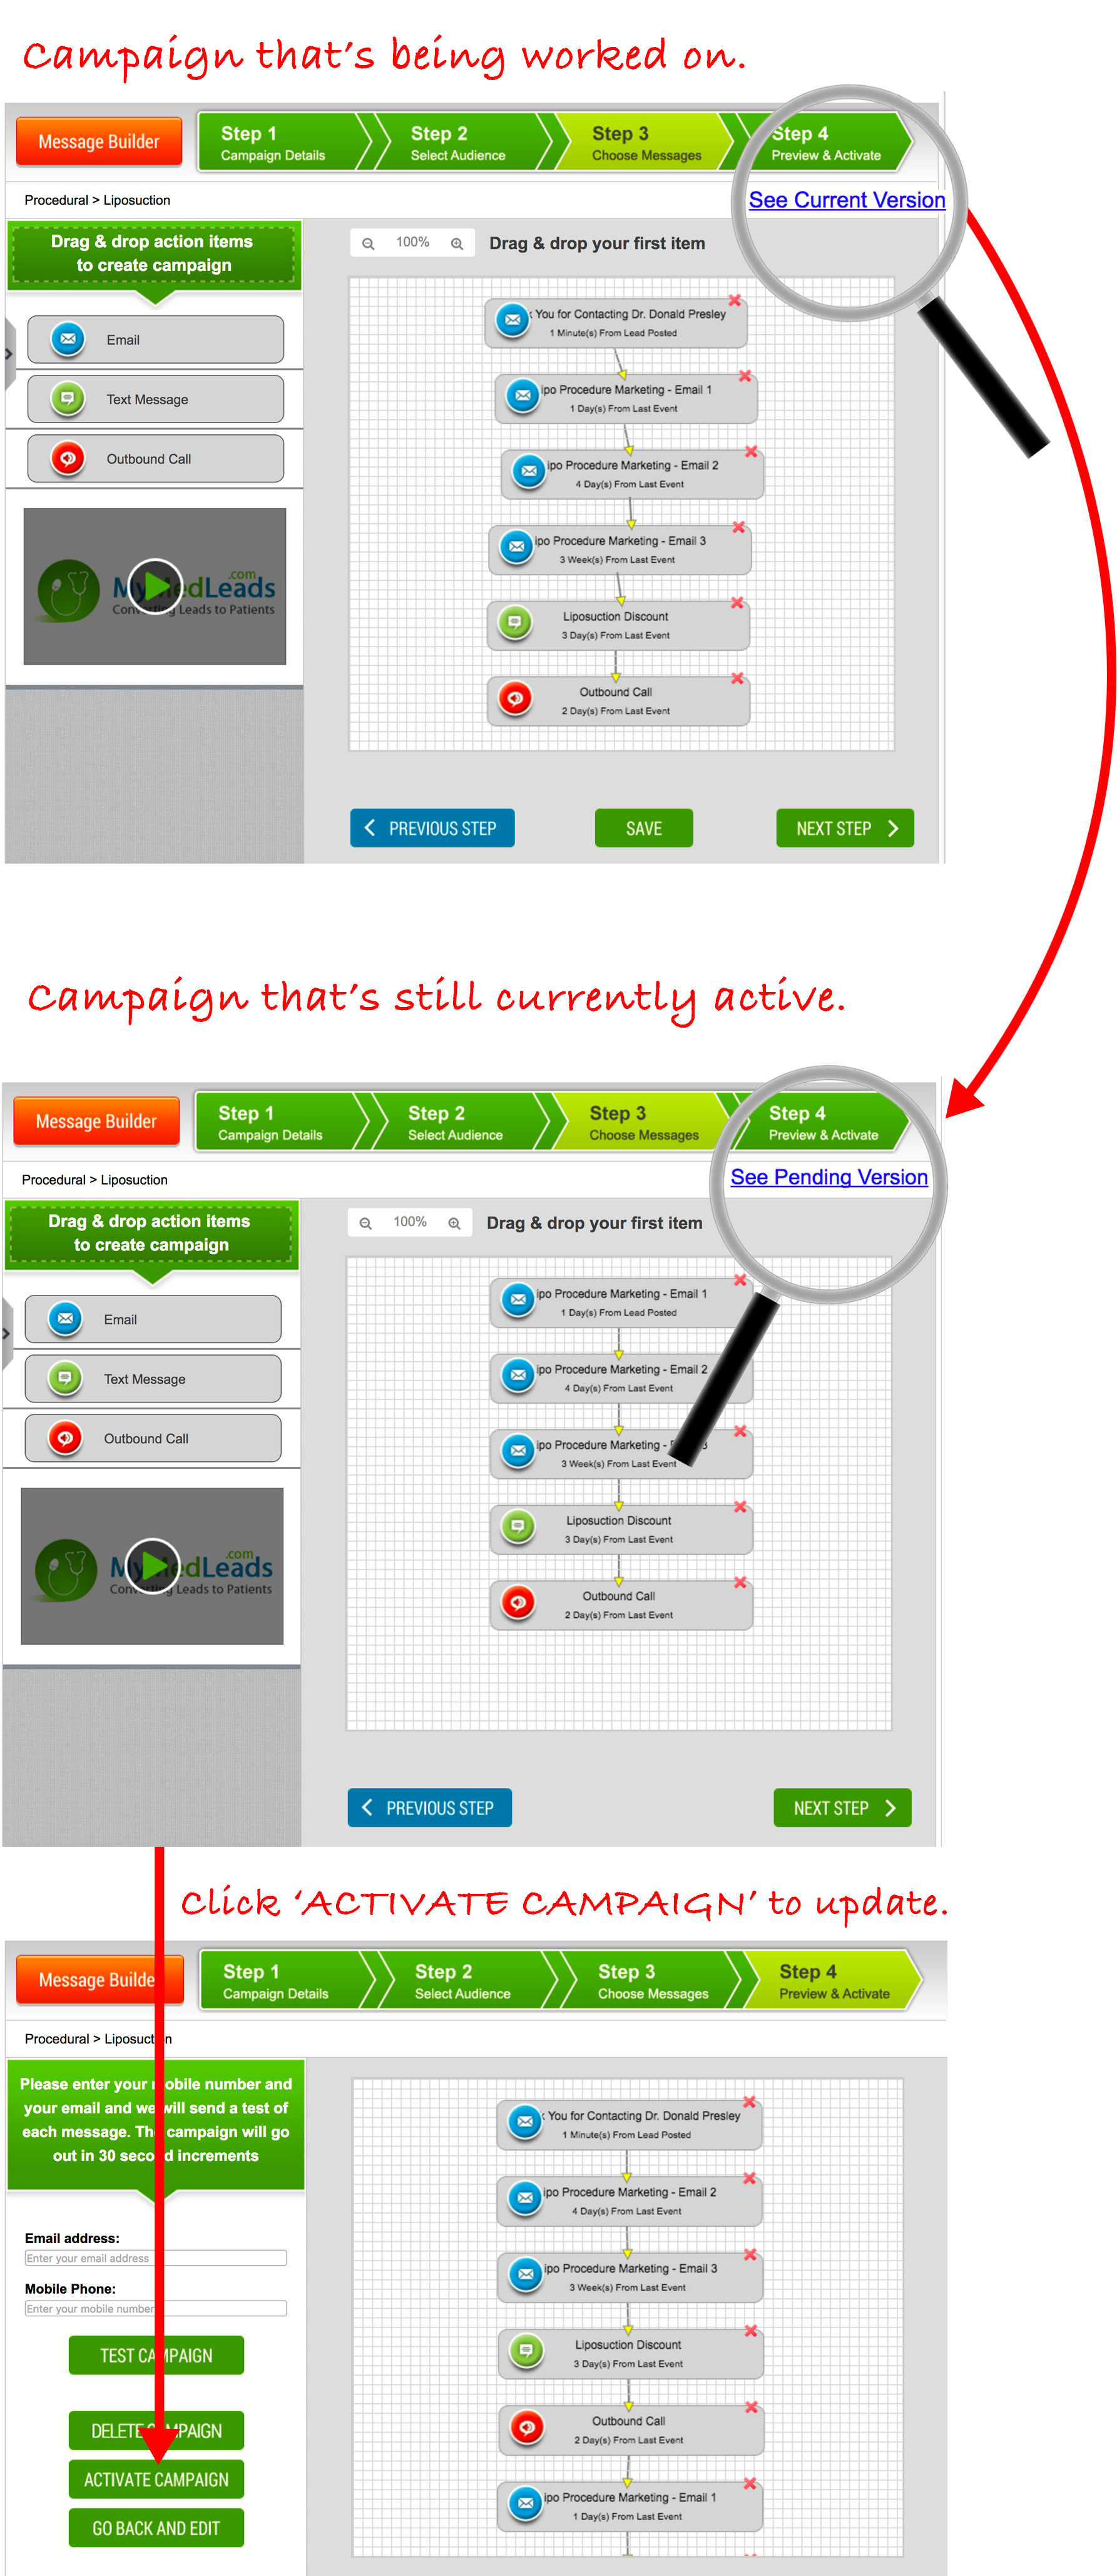
9.Modifying an Active Campaign: Pending vs. Current Versions
While it is not recommended, you CAN make changes at any time to an already activated campaign.
The MyMedLeads campaign system supports a Pending Version of a Live Campaign. Meaning, you are free to go into a Live/Active Campaign and make updates to it as you wish, without worrying about actually sending out incomplete messages or messing up an active campaign.
However, this does create an additional step – you must publish (Activate) the Campaign after the updates are made.
While you are editing an active campaign, you will see a blue link at the top right that says “See Current Version”, clicking this link will take you to the flowchart that shows the currently active campaign that leads/patients are receiving. On the Current Version page, you will see a link at the top right that reads “See Pending Version”, clicking this link will take you back to the version of the campaign with your updates.
Once you are happy with your changes, and are ready to update the campaign, click Save and Next Step to navigate to the “Preview & Activate” tab. Click on “Activate Campaign” to apply the changes to the active campaign.